Tuesday, May 26, 2009

Container Gardening - herbs

Ahh summer time! It's when we finally get some fresh veggies and herbs in our cooking!

I thought I'd dedicate this post to bore you all with some pictures of my container garden. :) As any proud plant mommy would do, I'd like to brag about how big they are and how pinchable their leaves look!

This is my first year as a plant mommy so bear with me. Being a n00b (extra dork points if you understood that), I didn't know what was an "easy" plant to grow -- So I mistakenly let the hubster pick 3 random herbs.

All of these guys (sans my tropical plant) have been grown from seed. When they first started out, I did place them under a grow-lite because we weren't getting enough sunshine in Pittsburgh (imagine that!). However, now they are on the balcony and should stay there unless we have any more crazy weather.

First up is sage. He's getting to be more sage like and it's interesting to see how he evolves from a young budding plant into the yummy edible sage!

Next up is my cilantro. He's doing quite well considering I've been told cilantro is tough to grow. Hes been attacked by mushrooms (which Dr. Oak so helpfully told me what to do when I did my mommy freak out) and he's doing well.

I also freaked out when I read I was supposed to soak the seeds of the cilantro first before planting... that didn't happen but these little critters survived my ditziness and they're alive and well. I garden by the Darwin philosophy... survival of the fittest.

The third picture is actually from a leaf we brought back from our honeymoon. Our tour guide gave us a leaf and told us to watch it sprout roots w/o dirt. It was impressive to see that it was alive after being smooshed in our luggage. It's thriving super well in the cold cold north.

There's also some basil in there. My company (a computer company...) had given us some basil 2 years ago and we planted and consumed some. Apparently we didn't plant this one bag since I found it in my desk when I moved... I figured there wasn't any harm in planting it now! It's doing quite well - a slow start but it's catching up now.

I purposely didn't take a picture of Bernie (my sad pathetic fern). I bought him on clearance and he's been dying a slow death ever since I brought him home. The hubster says hes dying because I named him Bernie. Sigh.

So there we go, the beginnings of summer! I have no real hope of consuming much of my plant children -- this year was more of an experiment more than anything else.

Are you planting anything? Herbs? Veggies? Cactus? I'd love to hear your plant stories!

Sunday, May 17, 2009

Tiramisu Cupcakes

I accidentally told Brian that my used craft sale was yesterday... nope...I accidentally messed up the dates. So he had to wake up early two days in a row (on a weekend -- the horrors!). As a way to repay, I decided to make him some tasty cupcakes.

Martha Stewart, my baking hero, is coming out with a new cupcake book. One of the recipes in it is a Tiramisu cupcake. It sounded tasty and once again, I needed an excuse to use the kitchen aide. Oh it's so pretty!

**Pic from MarthaStewart.com - I can't get a pic like that if I tried.

Once again, Martha didn't let me down. The cupcake was tasty and fluff-tastic! The coffee touch was great and it was cool to see it seep in. I would probably recommend just a little more coffee since it didn't seep as well as I thought it would. The icing -- well, I love me some mascarpone frosting and it was quite tasty.

All that said though, I will admit that there was a lot of work involved and I think you could find an easier base cupcake. While I understand the science behind beating an egg/sugar mixture over a pot of simmering water, there are easier ways to achieve a fluffy cupcake. Perhaps the Cake Doctor will have some easier suggestions for those of you who don't have 2 hours to make a cupcake...

Wednesday, May 13, 2009

"I Love Your Blog" Award

We received the "I Love Your Blog" Award from Passionate Eater a while back. Thank you so much. I'm such a fan of your site, and I always admire your appetizing pictures.

So it our duty to pass it along to seven deserving blogs that inspire us.


Here are my top seven picks:

1. Carding with a :-) a creative blog for the aspiring card maker. I'm a fan of her cards, but then again I'm not biased at all ;)
2. Scrapping On The Side another crafty friend who has some great ideas.
3. Who Da Monkey always something witty and funny to say, i like your style.
4. Talida Bakes an inspiring cooking/baking blog with beautiful pictures by a friend, who has the heart of gold.
5. Monk Eyelids I love tea and someone has to enjoy it and share it with the world! Go Eliezer!
6. I Dream of Desserts as a staunch follower of her previous blog (Cupcake BakeShop), we hope that you continue making wonderful desserts.
7. Crumby Icing my personal "Ace of Cakes" chick who is not afraid to try something big and scary.

I hope you continue to blog, because I read you all religiously. If you guys received this award, please pass it on to 7 other bloggers.

If Pudgey and Belinda want to award others with this "I Love Your Blog" Award, feel free to give them out. Spread the love :)

Wednesday, May 6, 2009

Bring on the Banana Bread

Banana Bread has always been one of my favorite quick bakes. It comes out moist, is not overly sweet, and tastes great warm or cold.

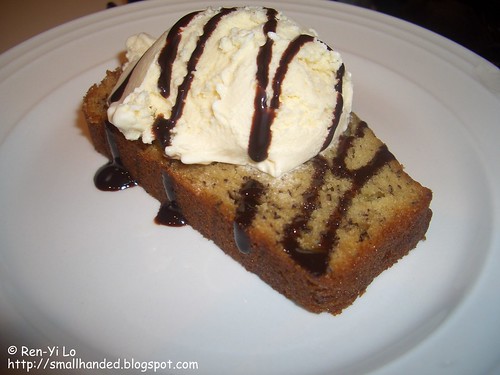
When two friends of mine were leaving the area, I wanted to make something special. However, our schedule did not allow me to host them for a nice dinner. Instead they swung by for an hour to hang out. Since I had some banana turning black, I thought banana bread was the perfect fast item to serve. I had just enough time to make it, so that when they arrived, I could serve up fresh-baked Banana Bread with Vanilla Ice Cream. Who wouldn't want to eat this?

In my attempt to rush all the ingredients together, I noticed that my oven was not preheating correctly. Evidently, there was something wrong with my oven and I quickly realized to my dismay that this was my first oven project since I've moved in to my new place. Duh--the oven was broken! But I was so determined to bake those banana loaves that I was ready to jump into the car and break into my parents house to bake these up, or "borrow" my neighbors oven. However, just as I was ready to put on those shoes, my little Black & Decker Toaster Oven was looking to innocently at me. Yep--it was the Black & Decker Toast Oven that saved my day. I "heart" you, lil Toaster Oven!

So this post is in honor of my friend, Karin, who will hopefully be able to make this in a real oven, with a little less crust on the banana bread ;)

Banana Bread

I made this recipe last week again (in a real oven) and here are my thoughts:
The banana bread came out moist and was just right with the sweetness level. I cut the sugar by 1/4 c, since ripe bananas are generally already very sweet. The bread also came out on the denser side, was less fluffy from another recipe that I have made in the past. This banana bread lack the height that my other recipe has, but the dense, short piece of banana bread seemed to complement the vanilla ice cream.

Banana Bread
adapted from Allrecipes.com, "Banana Bread I"

Ingredients:
* vegetable shortening, for greasing pans
* 1 1/2 c all-purpose flour (non-bleached)
* 1 tsp baking soda
* 1/2 tsp salt
* 3/4 c sugar
* 2 eggs
* 1/4 c butter, softened (equal to 1/2 stick butter)
* 3 overripe bananas
* milk (optional)

Directions:
01. Preheat oven to 350 degrees F.
02. Grease two 7x3 loaf pans.
03. Sift flour, salt, baking soda.
04. Place butter and sugar into a mixing bowl; cream butter with sugar on low speed.
05. Add one egg at a time, while mixing on low speed.
06. Mash bananas with a fork in a separate bowl.
07. Add milk, if the bananas are not ripe enough. The consistency should be mushy banana pieces and a little liquidy.
08. Add bananas to the mixing bowl; mix on low speed.
09. Add dry ingredient slowly to mixture; mix on low speed.
10. Once everything is incorporated, mix on medium speed for 1 to 2 minutes.
11. Split the batter into both pans evenly.
12. Bake for 35 minutes, or until toothpick comes out cleanly.
13. Remove pans from oven, and let stand for 10 minutes.
14. Remove from pans, and serve immediately.

Banana bread can keep up to one week, unrefrigerated. Just wrap it well in plastic wrap to keep it from drying out.
Banana bread can easily keep up to six months in the freezer. Just wrap it well in plastic wrap and place it into a freezer Zip-lock bag.

Friday, May 1, 2009

Meat and potatoes..

We had a 5 lb bag of potatoes and of course, while I was gone, the dear hubster didn't know what to do with them... It's not in a box... So when I got home, I had to come up with a fun way to use lots of taters. So Shepard's Pie it was! It's also a tasty way to squeeze in assorted veggies! Win win!

I'm in love love love with 30 minute recipes from America's Test Kitchen - as usual I modify it a little to add more veggies. For this one, I cut the meat in 1/2 and added a load of veggies I found in the fridge.

2 pounds of potatoes
3/4 lb of ground meat - technically you should use lamb but we only had ground beef
1/4 cup flour
2 cups stock
1 t Worcestershire
1 t thyme
1 onion
carrots
peas
peppers
assorted veggies
butter
cream

1. Cook ground meat until done. Drain and save 1T of oil. In the meantime, boil potatoes in water
2. Cook veggies and onion until tender. Add salt and pepper to taste
3. Add flour and stir until coated. Add stock, Worcestershire, thyme and bring to a simmer. Mix in meat until sauce thickens. Add veggies and simmer for a minute
7. Mash potatoes. Add cream and butter. I also used some sour cream as well for a little tang. Also put in some thyme in the taters as well.
8. Place meat and sauce into a baking pan. Dallop the mashed taters on top and spread. Spread a little melted butter on top and pop it into the broiler for a nice browning on top.
Related Posts with Thumbnails