

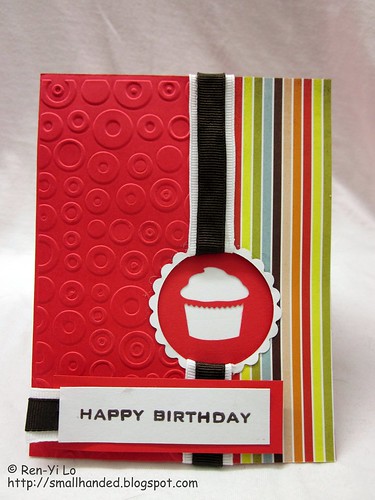
I even promised myself to start early this week! But with an unexpected accident and a run to the ER in the middle of the night that resulted in stitches and an upcoming work deadline, the week had turned into such a chaotic one. Can ya relate?! So here I am, on my usual Thursday after work trying to throw a card and blog post together. I chose a bright red card stock to start. And here is what came into creation:
Stamps: Free Spirit - Sentiments (Waltzingmouse Stamps)
Paper: Cardstock Paper - Red, White (Recollections), Offbeat (Basic Grey)
Ink: Earth Elements - Chocolate Chip (SU!)
Embellishments: Emboss A2 - Spots & Dots (Provo Craft), Nestabilities - Classic Small Ovals, Classic Scallop Ovals Small (Spellbinders), Celebrate-It - Brown, White (Michael's), Craft Punch - Cupcake (Martha Stewart)
That Provo Craft embossing folder had been sitting on my desk unopened for a while, and I decided I wanted a fun fun card. And since I was going to cut out a circle window I thought the emboss folder would fit my shape theme.
Spots, Dots and a circle window later, I was on a mad hunt for bright & fun pattern paper and pulled out the Basic Grey. After I added that layer, a scalloped white frame was necessary to hide the transition from the pattern paper to the cardstock.
At this point I needed to find something birthday-ish to stick in the window, and Martha's Stewarts punch was nicely within reach. The only debate was, white cupcake peeking from red cardstock, or red cupcake peeking from white cardstock? But that was quickly resolved after I saw that the white frame and the white cardstock didn't give too much contrast. So everything was adhered nicely, when I went about to find ribbon.
Not one ribbon seemed to match: they were either to thin or had crazy patterns. I didn't want pattern ribbon to add to the already craziness, and when I stumbled across my remainder white ribbon piece I thought I had something to work with. But everything still looked too "flat" and I thought a nice dark brown shade would do it, since the Basic Grey pattern paper had that nice brown stripe in it. Of course I'm not an engineer for nothing, and decided to create my own layered ribbon. I trimmed the white ribbon down the middle and adhered it to the left and right sides of the brown ribbon. I like the look, but I don't like the manufacturing quality, since it was a challenge to get it straight and evenly spaced. Can you see the un-eveness?
At this point I realized my newbie mistake. I wanted to run the ribbon through the hole and tack it on the back of the card, but my cupcake stack was in the way. Ooops. Two quick peels & one adhering job later I was close to done!
Reached for my favorite set o' stamp, and pulled a quick birthday label together. And with the little home-made ribbon scrap (that took so much love to put together), I created a little loop to finish it all :)
So here is hoping I can sneak in my whirlwind creation on time. I love how it "just came together." This actually goes against my plan-ahead personality, so I'm really surprised by how it turned out. Do you ever start without a real plan?
4 comments:
Oh how fun and bright! Love your use of the punches!!!
How cute! love that cupcake and the pretty striped DP! thanks for playing with WMS this week!
Very cool, love the bold colors
Belinda - trying to make use of all my tools!
Julias Aston - thanks for stopping by.
Erin (Homemade Cards by Erin) - thanks. i am still trying to feel comfortable with bold colors!
Post a Comment