Friday, December 25, 2009

[Project Lunch] Tuna Pasta Salad

The beauty of pasta salads is that they can be made ahead of time and pulled out later to be enjoyed, which makes it the ideal dish to bring into work. Since I had a bunch of leftover ingredients waiting in my fridge to be used, the timing was perfect to make one of these for Project Lunch. The ingredients are relatively inter-changeable, but I always like adding celery, since it gives the pasta salad another texture dimension: crunch.

[Project Lunch] Tuna Pasta Salad

Tuna Pasta Salad
* 1 lb pasta shells, medium
* 2 cans (5 oz) solid albacore tuna, drained & flaked
* 4 oz black olives, sliced
* 1 1/2 onions, medium, cubed
* 8 oz grape tomatoes, halved
* 3 ribs (1 cup) celery, cubed
* 3/4 cup mayonnaise
* chives, chopped
* kosher salt + pepper
* oregano
* olive oil

01. Bring large, heavy-bottom pan of water to a boil.
02. Add pasta and return to a boil; cook for 8-10 minutes until al dente.
03. In a separate bowl, combine mayonnaise and flaked tuna, until properly coated. Add olive oil as necessary to thin the mayonnaise down.
04. Add celery, onions and olives to tuna mixture. Add mayonnaise and olive oil as needed.
05. Add s+p, oregano to taste.
06. Add pasta into the mixture and toss until all ingredients are evenly incorporated.
07. Add chopped chives and cherry tomatoes; toss ingredients again.

Price Check
$ 0.89, Pasta (@ 0.89 for 1 lb)
$ 1.30, Albacore Solid Tuna (@ 0.65 for 5 oz)
$ 1.00, Onions
$ 0.30, Celery (@ 2.27 for 32 oz)
$ 0.55, Black Olives (@ 1.10 for 6 oz)
$ 1.25, Cherry Tomatoes (@ 4.98 for 32 oz)
$ 0.50, Mayonaise
$ 1.33, Chives (@ 1.99 for 10 oz)

Total: $ 7.12

Tips & Tricks:
* If the pasta salad is dry, just add a 1 tbsp water to revive the salad.
* Any pasta shapes (e.g., spirals, penne) will substitute well for this salad.
* Left-over rotisserie chicken is a good substitute for tuna.
* Half the cherry tomatoes & pre-chop the chives, but pack them separately. Add to the pasta salad right before serving.

Verdict & Lesson's Learned:

:) Both boys liked it and it makes it a perfect dish to tag along to work.

:( One boy could pass on the celery, since he isn't a fan of celery-tasting things. Maybe carrots could be a celery substitute and still add the crunchy dimension.

:) I like how fast this dish is to make and how portable this lunch project was.

Sunday, December 20, 2009

Meet Franzl, the Bavarian Bear

Every year around Christmas time, my company supports the "Toys for Tots" drive. It is a national organization, but the donations directly go to the surrounding community. Everyone at work is encouraged to participate by either donating new toys or donating money (if they do not have the time to shop), and one of the co-workers then goes on a spending spree at Toys R Us with the donations. Usually local volunteers, like the volunteer fire department, will then come pick up all the donated toys with a big truck and we have a huge send-off.

To kick off all this excitement, my company hosts a "Dress a Bear" competition. Anyone who wants to participate can pick up a bear, dress him up with either store-bought clothing or self-made means, bring him back, and then display him. The dressed bears are then put up for a vote, and best bear wins the creator bragging rights.

Like every year, I picked up a bear -- except forgot that I was going to be out of town for a business trip. So my delinquent bear snuck in for a group pose with the rest of the bears a week after the competition. No one taddle, so it's ok. And Mr. Bear will make one child happy -- which is all that matters :)

I'd like to introduce my Mr. Bear as actually Franzl from Bavaria. And like any good Bavarian citizen, he sports a cute pair of home-made lederhosen and a matching "Schlapphut" (floppy hat). Since Franzl is sensitive to animal rights (being a bear and all), he's wearing faux leather!

[Toys for Tots] Franzl, the Bavarian

Actually all the sewing credit goes to my co-worker who did this bear with me (teams are allowed). I gave creative direction and she did the grunt work. If it wasn't for her and her awesome sewing machine, he would have still been a naked little bear right now, since I knit and crochet about 1/100th of the speed she sews. So if you like what Franzl is wearing and have always dreamed of owning your own designer faux lederhosen, just leave us a comment.

Just kiddin'

But I hope you enjoyed meeting Franzl. And I hope he will bring big smiles to one special little boy or little girl this Christmas season.

Monday, December 14, 2009

[Swapping Sisters] December Swap

If you already saw the other Swapping Sister posts and were wondering where mine went...they posted early! Can you believe them?! Just kidding. I ran late creating my card and was struggling to balance my holiday prep, work, and guest hosting from China. But, dear Swapping Sisters, it is my new year's resolution to try harder to be on-time.

So for the Swapping Sister's second card swap I actually made a card (more like three, but who is counting?) To top it all, this is my first time creating cards solo. Stamping Around and crafting with an instructor doesn't really count, since there is always a teacher to tell me what to do next, and there is a prototype card to show me what it should have been.

Just a quick disclaimer: this post contains three cards and it's quite long. If you just want to see the pics, just scroll on through or head over to my flickr page for more pics. If you want to re-live my n00by card-making journey, read on.


This time Swap Sister Laurie sent out supplies which included a few fun items: Bazzill's Blue Swiss Dot paper, Quick Quotes' Pink Striped paper, Making Memories' Polka Dot paper, ribbons from Martha Stewart and Michaels, blue brads, pink buttons and a fun metal flower.

To make matters sweeter, I was visiting Belinda for a very extended weekend. And being at Belinda's is like being in stamping/crafting heaven. It means that I got to play with hardware and learn new technique. Let me just say that after this long weekend, my Christmas wish list just grew a few feet... ;)

The first card is a simple "thank you" card. I knew I wanted to use the pink ribbon as my sentiment. From there everything kind of fell in place: pink pairs well with black, and the polka dot paper had some nice shades to match the whole get-up. So out came the 3/4" circle punch to pull out the perfect shades of dots from the polka dot paper for the card. I also ran the black cardstock through Belinda's Cuttlebug to emboss the "Spots & Dots" design on the card to tie the dots and circle theme together. My "cherry ontop" was the metal flower embellishment.

[Swapping Sisters] December Swap
Paper: Black (Recollections), Polka Dot (Making Memories)
Embellishments: Pink Thank-You Ribbon (Martha Stewart), Metal Embellishment Flower (Making Memories), Dots and Spots Embossing Folder (Provo Craft)

I quickly found an assembly problem when the ribbon went down onto the black cardstock. It was too sheer for the sentiment to really stand out, so I cut a piece of white cardstock strip to match the width of the ribbon and backed the ribbon onto it. And voilà, the ribbon is able to convey it's message.

The second card is an ode to the Quick Quotes pink paper and my Swapping Sisters. I have been dying to ink up my "Trendy Girl" set from Sweet & Sassy Stamps, and Belinda generously shared a stack of pattern paper that she had. I used various select regions parts of the paper to design three of the purses that I pulled from the set, leaving her with funny-shaped holes in the most random parts of the paper ;) Additionally, the border punch adds a nice "girl" touch. At that point, the black card stock felt too much, and I corner-punched the bottom edge to trim a bit of black away. I also knew I wanted to use the white ribbon to create the winning pink-black-white classy color combo and went about to create a fun non-tying ribbon. (Ha, just ask Belinda how horrified I get when tying ribbons -- they always look lopsided and sad!)

[Swapping Sisters] December Swap

For the sentiment, I tried stamping it with a cream color pigment ink onto the pink, but that didn't show very well, since this pink has loads of white stripes. So I decided to stamp it with black and punch it out using a 1 3/4" circle punch. On a side note, I chose to rotate the paper for the sentiment, so that the white stripes were horizontal, rather than vertical. This allows the sentiment to stand out more from the background pattern.

Incidentally, the previous night, Belinda and I played with the Glimmer Mist that she picked up and we tried it on black paper. That stuff is awesome and created a nice subtle shimmer effect, and since I didn't want to "waste" that piece of paper, I punched out a scallop to back the pink circle, so that I could add a layer between the pink background and the pink circle. The shimmer gives it an extra dimension without actually adding another paper layer.

The card needed some "white" to balance, and since I discovered the awesome-ness of eyelets and I need to make use of my newly acquired crop-a-dile, I decided to "frame" the sentiment with some white eyelets. I like how it gives it a little playful touch. At this point I thought I was done, but the polka dot paper looked so neglected, and I liked how the dots had different patterns and textures printed on it. So I punched out the dark pink ones, and created a background paper. This of course meant that I was able to use the whole and non-whole circles.  Yeah -- I like to do things backwards ;)

[Swapping Sisters] December Swap
Stamps: Trendy Girl (Sweet 'n Sassy Stamps)
Paper: Black (Recollections), Pink Striped (Quick Quotes), Polka Dot (Making Memories), various pattern paper
Ink: Black (Staz-On)
Embellishments: White Ribbon (Michael's), Floral Lace Edge Punch (Martha Stewart), Corner Punch (EK Success), 2" Scallop (Marvy Uchida), 1 3/4" Circle (Stamping Up!), Gold Glimmer Mist (Tattered Angels), White Eyelets (Making Memories)

My stay in Pittsburgh made me miss the warmer weathers. I drove in a snowstorm, walked around in the cold to run errands, and when I was inside staying warm, I watched it snow. This was probably why I avoided the Bazzill blue swiss dots paper. However, while I was working on another paper craft project, the little penguins from the imaginisce "A Shore Thing" line kept looking so happy. So the inspiration to make a fun summer card (in the middle of December) starting coming together.

I secretly had so much fun embossing the first card, I wanted to find any excuse to play with the Cuttlebug some more. I love love the d'vine design and decided it mimics the water waves at the beach. I knew I wanted to use the white ribbon to separate the swirl and non-swirl part of the paper, which became my base.

Pepé and Pia (yes -- I gave my penguins names) were stamped onto white cardstock and colored with pencils. Belinda happened to show me the neat blending trick with odor-less mineral spirits, which I immediately put into use :) Just don't try to watch TV and blend at the same time! The penguins were my only chance to give the card some bold, warm colors to offset the cool color background. So their swim gear and accessories were colored in yellow, reds, oranges, and pinks.

To give it a whimsical take, the penguins needed to be positioned so that they pop off the card. The perfect way to create that effect is to pull out some nesties to provide a "frame" for the penguins to leap of. I liked the large scallop nestability and then happily pulled out the Cuttlebug again. I felt that the penguins needed another layer or so and my eyes strayed to the chalk paints that Belinda pulled out for me to play with. Penguins, fun background, and chalks! The shade of blues in the box were perfect and I set out to look for swirl stamps among Belinda's collection to create that background, so I could emboss the stamp onto white paper and run the chalk over the design. The penguins looked happy, and to make them look warm, I added a little sun (yep, it was punched out from the polka dot paper!).

The card needed a cute sentiment to tie it together and would be perfect in conveying a "just sayin' hello" message. I found two sentiments "hello" and "friends," where I masked out the "s" on the latter word. In addition, I drew in the comma and exclamation point, trying to mimic the style as much as possible. Did I fake it well? I tried a little paper piercing to emphasize the word "friend," but could have just as easily left it out. To tie it all up together, Laurie's blue brads were the last perfect "blue" addition to the card.

[Swapping Sisters] December Swap
Stamps: Penguin Dude (imaginisce Snag 'em Stamps), Penguin Chick (imaginisce Snag 'em Stamps), Swirl (?), Doodle Flower for Sentiments (Sweet 'n Sassy Stamps)
Paper: Black (Recollections), Light Blue Swiss Dots (Bazzill), White (The Paper Company), Polka Dot (Making Memories)
Ink: Black (Staz-On)
Embellishments: White Ribbon (Michael's), Square Blue Brads (Making Memories), Scallop Nestabilities (Spellbinders), d'vine Swirl Embossing Folder (Provo Craft)

Now that you have made it through my long post, I really want to add one more quick thing: i owe a big thanks to my girl Belinda! Without her toys and her quick techique demos, I would not have been able to create three fun cards. I had a blast hanging out and playing, and because of that, I know exactly what new hardware I want to acquire :)

To help me feel less bad for posting late, do me a favor and hop back to these awesome posts to see what these creative girls have created:


Interesting take on the same supplies, right? I love how everyone uses and emphasizes the colors of the paper differently!

Saturday, November 28, 2009

[Project Lunch] Smoked Salmon & Roasted Pepper Wrap with Tomato Salad

I had some brilliant inspiration from the pesto and mayo I saw sitting near each other in my fridge. I wanted to make a wrap with pesto mayo, and before you know it I dug out all the ingredients to make a great Smoked Salmon & Roasted Red Pepper Wrap. It's a fast and yummy, since the pesto mayo balances the smokey but sweet red peppers. In addition, the red peppers adds a nice complimentary sweet flavor to the salty, smoked salmon. To round of the lunch (and make the boys eat more veggies) I added a Tomato, Onion & Feta salad.

Smoked Salmon Wrap

Smoked Salmon & Roasted Pepper Wrap

* 1 1/2 tbsp pesto
* 1 1/2 tbsp mayo
* 3 spinach & garlic wraps
* 9 oz smoked salmon
* 8 oz roasted red & yellow peppers, drained & pat-dried
* onions
* spring mix
* fresh ground pepper

01. Mix mayo & pesto; add freshly ground pepper to taste.
02. Spread mayo pesto on wrap.
03. Layer smoked salmon, onions, roasted peppers & spring mix.
04. Tightly roll & fold wrap; fasten with toothpicks.

Tomato Feta Salad

Tomato & Feta Salad

* 1/2 lb campari tomatoes, quartered
* 1 sweet onion, sliced
* 3 oz feta cheese
* olive oil
* salt & pepper

01. Mix tomatoes, feta cheese, onions.
02. Add drizzle of olive oil, to lightly coat.
03. Add salt & pepper to taste.

Price Check
$ 1.35, Spinach Wrap (@ 2.69 for 6 wraps)
$ 8.03, Smoked Salmon (@ 14.27 for 1 lb)
$ 2.79, Roasted Peppers
$ 0.25, Mayo
$ 0.50, Pesto (@ 3.89 for 10 oz)
$ 0.96, Spring Mix (@ 3.87 for 1 lb)
$ 1.06, Tomatoes (@ 4.24 for 2 lbs)
$ 1.00, Onions
$ 0.74, Feta Cheese (@ 5.96 for 24 oz)

Total: $ 16.68

Verdict & Lesson's Learned:
:) Both boys said it was ok. They enjoyed the flavor experience.

:| Both boys sheepishly noticed that it wasn't really cooking -- more like throw together ;)

:( The feta cheese already is seasoned with salt, so pre-mixing the tomato and feta resulted in a lot of tomato juice extracted. Best to bring in separate containers.

:( Similarly, the spring mix wilted over time when I pre-wrapped the sandwiches prior to work. The lettuce lost its crunch and took away from my fresh wrap experience.

:( A bust on my budgeting, but there is probably ways to trim the ingredients justify the cost of the more luxurious, but oh so tasty ingredients.

If I had it my way, I would not try to make this as a packed lunch again. I have to find a way to tweak how this can be brought in, or save it was a luncheon item at my house. The wraps would have tasted exponentially better if rolled on the spot and eaten immediately. Similarly with the salad, it was not a good idea to pre-toss the tomato feta salad without dressing, because the feta cheese had enough salt to make it a very watery experience -- making the olive oil dressing almost unnecessary.

Sunday, November 22, 2009

[Swapping Sisters] November Swap

One of the reasons I was so easily convinced to go to "Stamping Around" with Belinda was because I signed up to do this card craft swap with Belinda and two other girls. Seeing that I know nothing about paper and crafts -- I figured it'd be a good learning experience. I'll have to post those projects later with some of my fun learning experiences.

Anyway, I digress. The card craft swap is actually a neat idea, since we are all spread across the continental US. A fun way to stay in touch with old friends and new friends, and make new friends.

So the deal is each month one of the girls creates four identical kits and sends them out. We each make something out of the stuff in our kit and then post (ideally) on the same day. Most of you guys know that I'm not (yet) a paper crafter, and since the girls were so nice to "loosen" the card craft swap to a craft swap, I decided why not! It's a great way to learn something about making cards (without buying all the crazy hardware) and keep myself accountable on the crafting.

I mentioned earlier that we would all post "ideally" on the same day. This first project post date was November 9 and, well, we know what today's date is...To my defense, it's all because of the traveling and working.

So here is a breakdown of Project Craftiness with the Swapping Sisters. Belinda started with Round 1 and sent us a kit with the following ingredients: yummy Cosmo Cricket Paper (Early Bird), a nice long strand of dark blue ribbon, some yellow & green brads, and a punched out star.
Swapping Sisters Project 1
Stamps: Blast Off (Sweet 'n Sassy)
Paper: Beige (Recollections), Early Bird (Cosmo Cricket)
Embellishments: Dark Blue Ribbon (?), wooden stars (Michael's), Blue Awning letters (K&Company)

I had planned to convert this blue, fabric journal I had picked up from Border's. There were a few challenging issues with this: hardback, fabric, and for a boy. Here is what I came up with:

Swapping Sisters Project 1

I found some chipboard letters to spell out the recipient's name on the journal. I actually had these purchased before the card kit came in. I decided that I wanted to create a fun three-panel with the green Early Bird pattern paper. The other pattern paper were really fun and hot, but too busy for the boldly colored space shuttle to stand out. The space shuttle is from the Blast Off digi set from Sweet 'n Sassy Stamps.

To keep this project from too much girly, I needed to come up with an idea to incorporate the ribbon and decided to wrap the panels. I like how the dark blue ribbon adds another shade of blue to the green paper -- a nice and simple effect. Last, the whole thing was finished by adding a moon and a few wooden stars.

Swapping Sisters Project 1

By the way, all coloring was done with my trusty Prisma markers & pencils--which I have had since 10th grade in high school. At least there is one unexpected high point in paper crafting: going back to using my art mediums is making my mom happy. She always questioned why I needed such expensive pencils...

So now that you have seen my project, hop on the other gal's blogs and see what other fun & creative ideas they have come up with:

Belinda
Laurie
Stephanie

Thursday, November 5, 2009

Stamping Around Philly--Here I Come!

I just wanted to pop in to apologize for not posting. I have been traveling a lot for work lately and been spending many hours in a hotel room in the Great White North. Of course I didn't pack any fun things with me to work on, since I knew I was going to get owned by the late hours of work. So no fun new pictures of my lunch projects or otherwise crafty projects because, well, there isn't much to show & tell right now.

But this weekend I'm off to Stamping Around with Belinda. W00t.


I'm really excited, because it means hanging with one of my favorite chicks and crafting all weekend long...with exceptionally talented girls in the card-making field. I adore all of the stamp companies that are coming and really am looking forward to learning lots.

So, you'll be hearing of my stamping & cropping adventures, as this n00b (newbie) tries to keep up with these very experienced and talented ladies. I feel really intimidated...

Monday, October 12, 2009

Polycystic Kidney Disease

This deviates from the regular blog theme, but a friend of mine, staceyT, has something important to say about this disease, and I thought I would re-post some important facts here. There is not much awareness spread about this disease.

If you feel moved by what you read, please consider donating to StaceyT and the PKD Foundation here.

Polycystic Kidney Disease is one of the most common, life-threatening genetic diseases, affecting 600,000 Americans and 12.5 million people worldwide. PKD is more common than Down syndrome, cystic fibrosis, muscular dystrophy, and sickle cell anemia - combined. Polycystic Kidney Disease causes fluid filled cysts to form on both kidneys. Over time, these cysts grow and multiply, sometimes dramatically in size. For most patients, their PKD ultimately causes the kidneys to shut down. Once that happens, dialysis and transplant are their only options to prolong life. Parents with the dominant form of PKD have a 50% chance of passing the disease on to each of their children. For the recessive form, ARPKD, parents have usually never heard of PKD until their newborn is diagnosed with it. For 30% of newborns, ARPKD is fatal.

Although there is no treatment or cure for Polycystic Kidney Disease, there is hope… Stacey's dad has had 2 kidney transplants in the last year (the 2nd kidney is doing very well and as of June 30th he's past the 3 month post transplant mark!). But even though he now has a functioning kidney, the battle is far from over. He has other PKD related health issues to deal with on a daily basis. Plus, both Stacey and her sister each have a 50% chance of getting PKD. Please consider joining our fight — by donating to the cause, registering for the walk (and raising funds) — or both! Every little bit helps!


In other news, Bleu Bella Paperie has graciously decided to donate all card sales from her store to the PKD Foundation. In addition, Belinda and I are committed to donating a $1 for every comment on Bleu Bella Paperie's post, to StaceyT's cause. So head on over and leave a comment. To sweeten the deal, there is also a blog giveaway.

Thanks for taking the time to read this.

Tuesday, October 6, 2009

A Big Thank You

I just wanted to give a big thanks to those that supported my 5k race. I had a few goals for the day of the race:

1. support a good cause
2. have fun
3. finish the race
4. finish it under 45min
5. not be dead last

I managed to achieve all of the goals with your great help. Yeehaw!

And on top of that, thanks to my generous supporters I managed to raise more than my 100$ goal.

After 5K Race

So, to everyone that supported me in one way or another -- thanks for the words of encouragement, watching me race, and supporting my cause financially! You made this whole event worthwhile and fun for me.

Monday, October 5, 2009

[Project Lunch] Spaghetti alla Carbonara

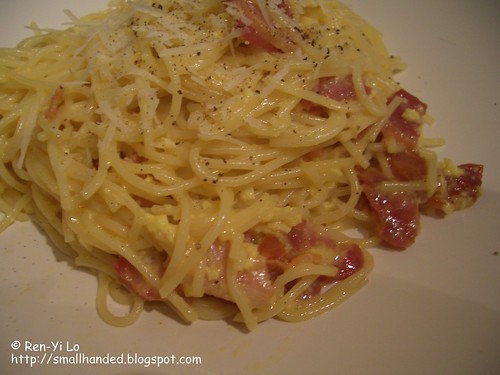
Last week's "Project Lunch" kicked off and I am happy to report that I fed all three of us to contentment--and all under $10. Since I did not have much time to make something, I decided to pick up pancetta on the way home to make my favorite, quick dish: Spaghetti alla Carbonara.

Spaghetti alla Carbonara

Spaghetti alla Carbonara is like breakfast in disguise: eggs, "ham", cheese all served with a carb. Who would not want to eat this for lunch? The only thing I regret about this dish is the lack of "veggie of the day." However, the boys certainly didn't mind ;)

Spaghetti alla Carbonara
adapted from "Pasta: 40 Wonderful Classic Pasta Recipes"

* 1 lb spaghetti
* 1 tbsp olive oil
* 8 oz pancetta, medium-thick slices
* 4 eggs
* 5 tbsp light cream
* 4 tbsp freshly, grated pecorino romano
* salt + pepper

01. Bring large, heavy-bottom pan of water to a boil.
02. Add pasta and return to a boil; cook for 8-10 minutes until al dente.
03. Chop the pancetta into squares.
04. Heat olive oil in a heavy-bottom skillet.
05. Add chopped pancetta; cook over medium heat, stirring frequently for about 8-10min. Do not let pancetta crisp.
06. Beat eggs with cream in a separate bowl.
07. Season egg mixture with s+p.
08. Drain the pasta; immediately return the pasta to the pan.
09. Tip the pancetta and oil from the skillet into the pan.
10. Add egg mixture to the pan, along with 2 tbsp of pecorino romano to the pan.
11. Mix well & serve immediately.
12. Finish off by sprinkling parmesan and pepper onto each serving.

Tips & Tricks:
* Salt the pasta water so that it "tastes like the sea." This is the only opportunity to flavor the pasta.
* Drop the pasta and the pancetta into their respective pan or skillet at the same time. Since they have the same cooking time, they will be done at the same time, allowing the pancetta to be mixed in while the pasta is still hot.
* Make sure that the heat is off when adding the egg mixture to the pasta. Otherwise, the eggs will start hardening together, resulting in some resemblance of soggy scramble eggs. The goal in Carbonara is a nice smooth & rich texture, but some coagulation in the eggs is acceptable (due to the heat from the spaghetti).
* When bringing this to work, only make the pasta and pancetta ahead of time and mix them well together. Incidentally, the pancetta and oil keeps the pasta from sticking, which works out well. Bring the egg mixture and the cheese in separate containers. Re-heat the pasta in the microwave by adding 1 tbsp water and keeping the bowl covered with plastic wrap, until steaming hot. Quickly, pour the egg mixture and stir well, until all of the pasta is coated. Serve immediately.

Price Check:
$ 1.00, Pasta (@ 1.00 for 1 lb)
$ 5.09, Pancetta (@ 9.99 for 1 lb)
$ 0.39, Light Cream (@ 2.50 for 16 oz)
$ 0.64, Eggs (@ 2.89 for 18 pcs)
$ 1.50, Pecorino Romano (@ 11.99 for 1 lb)

Total: $ 8.62

Verdict & Lesson's Learned:
:) Both boys said it was a keeper on the "Project Lunch" menu.

:| One boy mentioned that the portion size was ok; the other said he could eat an additional bowl. We each had 1.5 bowls or so, and I felt quite satiated after that. Since there are 2 votes for "just right" and one goal is to be conscientious about portion sizes, I'm sticking with 1 lb. of pasta.

:( Nutmeg came up as a missing spice in a dish. But as much as I value their feedback, I'm throwing this suggestion out. When I'm on a mission to make Carbonara, then the Carbonara-purist in me screams: "No nutmeg!" For me, Carbonara is synonymous to simplicity. The simplicity in making this marvelous rustic, yet decadent-tasting, filling meal with just five ingredients. I'm also very adamant about the pasta, since this is a spaghetti dish -- no other pasta will suffice for me, since the twirling and slurping of egg with cream is just a must! But really any pasta that picks up sauce well (e.g., penne, bucatini) will do. The one part that I would love to change is the pancetta. The original recipes call for guanciale. But where can I find this piece of delicious meat?! If you know, do tell! I promise to keep your secret...

On a disclaimer note, there are many tasty variations, and I am not against to tasting them. In fact, our local Italian place makes their Carbonara version with sauteed onions and bucatini, leaving the happy and delirious diner in a trance-like food coma. On another plus note, they have figured out how to sneak in "veggie of the day" (if you consider onion a veggie)...something for me to go ponder ;)

So, are you a Carbonara purist, too? Or do you have a delicious version that you stand by? I'd love to hear about it! In the meantime, I hope that you'll have fun trying this really quick recipe.

Friday, October 2, 2009

[Project Lunch] Are you up for the Challenge?

I have hinted in my previous post that I am starting a lunch project. That's not entirely true, since I should really be saying "we are starting a Project Lunch." Two of my friends from work and I were having lunch as usual when we had a few revelations:

[Revelation #1]: The financial crisis. Funny enough, all the lunch places near work that we generally frequent did not "drop" their prices or offer any "recession-proof" lunches like some other chains have (e.g., TGIF).

[Revelation #2]: We easily spent $7-13 per person. That's an average of $10/person, or $30 for three. One work week makes $150. One month? A whopping 600$ on just lunch during work weeks.

[Revelation #3]: It's always the same stuff, isn't it? We cycle between pizza, sushi, chinese, burgers, and italian. Sometimes we throw in sandwiches or an Indian buffet to "mix it up." But generally, we each order the "same thing" on the menu too. Boring!

[Revelation #4]: Unhealthy portion sizes! Since portion sizes in the US have grown into monstrous servings, we know that any reasonable person needs only half of what comes on that plate. And besides, when it comes to "food coma vs greedy foodie"? Food coma always wins out and really inhibits that productivity in the office!

[Revelation #5]: I can make that...for less! I was sitting in a restaurant, eating a very delicious smoked salmon wrap, but the components were easy enough to reproduce for much less, so why not make it?

So, here is the weekly "Project Lunch" challenge:
Cook 3x a week for three people.
Each meal should be under $10.


It boils down to making lunch once a week -- ain't so bad, right? Are you up for the challenge?

Saturday, September 26, 2009

Run a 5k in 1.5 weeks...?


Who knew we had invisible readership? A dear friend from Germany wrote me an email asking if everything was ok, since I haven't posted since June. It's nice that there was such a concerned email (Yes, shame, shame on me!) so I'd like to apologize for being so unreliable. So much of my goal for posting once a week... So here is what's new:
  • I have switched from a PC to a Mac. Thank goodness for smb protocol, or else I would still be sitting here trying to transfer all my things from my two other PCs onto my lil, shiny, new Macbook Pro. (Yes, I'm writing this post from my Mac ;)
  • Went traveling within the US and outside of the US to see friends get wed.
  • Friends from afar came to visit and I got to hang out and see them (and stuff myself silly with them!)
  • Went to see Dragonboat Racing and saw Sherry paddle with the Golden Dragons. It was fun to cheer them on and hang out at their race tent. Thank you, Golden Dragons, and see you next year!
  • Had myself some girl time with Sherry and got to bake Banana Bread.
  • Watched way too many movies, including "Cloudy...With a Chance of Meatballs" and "Julie and Julia." Word of warning: don't go see those movies unless you have eaten, unless you want those hunger pangs and growly stomach in the middle of the movie.
  • Welcomed my new, sweet neighbors (with food of course ;)
  • Starting a lunch project (more later)
  • Been training like a crazy chick for the Susan G Komen Race
Susan G Komen's "Race for the Cure" was a last minute decision. Last Monday I realized that I haven't ran a 5k yet, although it was one of my goals since the beginning of the year (tsk, tsk on me!). So I looked up 5k runs in the area and found many up until November. Although there are many good causes, the cause I really wanted to run is for breast cancer. One reason is that I have family that survived breast cancer. Another reason is that I use to run this race in Pittbsburgh with Pudgeykins and I've been supporting this cause for years now.

The only catch? It is in exactly one week from now. And after my test run Thursday, I discovered to my dismay that I can't even run a mile right now. So wish me luck! I'm hoping to run the 5k in a reasonable time (and not be dead-last).

So I registered on Friday and have decided to raise $100 (suggested donations). I figured I can find 10 supportive friends that will donate $10 each, or 20 supportive friends that can throw in $5? And if I exceed, I'd be super ecstatic.

If you feel inclined to support the Susan G Komen foundation and/or me running, here it my race page

Sunday, September 6, 2009

Compiling Greeting Cards

So it's been a super busy summer for all of us small-handed people. So we've kind of left posting to the wayside a little. *smile*

I had a stack of wedding cards and I couldn't bear to toss them so I figured I'd save them all in a decorated little book. This would work for birthday cards as well, wedding shower cards... (when I find them....).. the possibilities are endless here!

I punched holes into all of them and strung them through a metal ring. I tied some pink, green, and white ribbons around the metal ring. Brings me back to high school when the cheerleaders used to tie multiple ribbons in their hair...

I organized them by friends, family and family friends. I put our friends first cos they wrote the most, family next cos some of them did write stuff and then family friends last. Mainly cos most of them wrote stuff in Chinese that I can't read. Hah.For the cover, I took a piece of A2 cardboard I had (I think it was from a cardstock package or something...). Cut it in half and then proceeded to decorate it. I had some yummy Amy Butler paper from the Tea line and the Lotus line. I'm actually hoping to find that fabric as well -- I'd love to make a fun bag or something with it. Especially now that I need to find some sewing projects to amuse myself with!

Ok, I digress... the rubons and die cuts are also Amy Butler. The thickers are cloth ones from American Crafts... I LOVE these. The texture on them is just fab.

My metal ring was just a tough squeeze for the number of cards I had... I didn't think I had that many... so I will be getting some bigger rings later so it's easier to flip through the cards. Otherwise, it's a great way to put the cards out so that the hubs and I can reminisce about the wedding. And its so much prettier than in a box or something, don't you think? :D

When I find my wedding shower cards, I'll do the same. I just can't remember where I've stashed them... with all our moving furniture around I've lost track of the "safe" spot I've put them. I could have sworn they were with my wedding cards...

What do you guys think? Do you have a bunch of cards laying around as well?

Paper: (Gray) Unknown, (Lotus, Afternoon Tea) Amy Butler
Accessories: (Cloth Thickers) American Crafts, (Rub-ons) Amy Butler, (Die-cuts) Amy Butler

Monday, June 29, 2009

TOP 20!!! Please Vote!

I think most of you already saw this but PLEASE PLEASE VOTE FOR ME! :D

This week's PC Gallery Idol's challenge was to create a wedding card. Somehow being just married, one would think this would be easy peasy. Quite the contrary! I had kicked every wedding thought out of my mind -- I was so thrilled when the wedding was over! I am NOT eager to ever go through that again (hoping I never have a little girl...hah!)

When I was dress shopping, I LOVED all the fun beading on the designer dresses. I couldn't afford any of the designer dresses (or rather chose to spend the money on the guests rather than a dress I wear once), but that doesn't mean I can't mimic it on my cards! My favorite designer is Maggie Sottero, so much fun inspiration there! :D Sadly, my favorite dress is already gone but there's lots of other fun dresses! Oh I could just swim in them!

The swirl is hand doodles with a glue pen -- after all, if designers hand bead their dresses, I can hand doodle a swirl. ;-) I wanted to give it an ethereal look - after all, isn't that how all women feel about their wedding day?

Hopefully this evokes enough memories or dreams of futures to be that it'll launch me into the top 15. :D

Please consider voting for me today! Voting is open from noon MST today to noon MST Thursday. (2pm EST, 11 Cali). My entry is #17 in the voting tab

Supplies: Cardstock (White, Blue) Papertrey Ink, (Vellum,Gray) Archivers, Clear Stamps: (sentiment from Everyday Classics) Papertrey Ink, Rubber Stamp: (silhouette) Inkadinkadoo, Ink: (Cobblestone) Vivid!, Accents: (Flower) Maya Road, (Pearls) Hero Arts, Border Punch (Martha Stewart)

Saturday, June 27, 2009

Crocheted Flowers

I used to think crocheting was for old ladies. My mom used to crochet these little lacey things to put under our lamps at home and I felt they were so "yesteryear"! Apparently no one ever told me you could crochet flowers!

After seeing them on various blogs, I finally buckled down and decided to learn how myself. A few unsuccessful attempts of watching various you tube videos and a crash session with Ren-Yi for a weekend, I made flowers! Aren't they so pretty!

(Disclaimer: The light pink and light blue ones on the right, aka the non-lopsided ones, are crocheted by Ren-Yi)

Next on the list, to have Ren-Yi teach me to make a butterfly! Or maybe I should outsource that one to the person with the id of flutterby.... ;-)

Thursday, June 4, 2009

Let's go Pens...

There is really no excuse for not posting, but when it's NHL playoffs, there are no questions to my priorities! The Pens are playing their heart out on the ice and I've been doing my part on cheering them on. So you know where to find me -- my couch! So I hope you're secretly not missing any posts since you're rooting for the Steel City, too, right?

At least the playoffs have inspired my next crochet project.
Check the pattern out. Isn't he cute? I think I'll name him Fleury.

After Stanley Cup playoffs are over, I have a goal of posting once a week. Maybe I will even make twice a week if I can get my act together. So look for more baking and cooking, and fun other projects. And if you don't hear from me, feel free to poke me.

Tuesday, May 26, 2009

Container Gardening - herbs

Ahh summer time! It's when we finally get some fresh veggies and herbs in our cooking!

I thought I'd dedicate this post to bore you all with some pictures of my container garden. :) As any proud plant mommy would do, I'd like to brag about how big they are and how pinchable their leaves look!

This is my first year as a plant mommy so bear with me. Being a n00b (extra dork points if you understood that), I didn't know what was an "easy" plant to grow -- So I mistakenly let the hubster pick 3 random herbs.

All of these guys (sans my tropical plant) have been grown from seed. When they first started out, I did place them under a grow-lite because we weren't getting enough sunshine in Pittsburgh (imagine that!). However, now they are on the balcony and should stay there unless we have any more crazy weather.

First up is sage. He's getting to be more sage like and it's interesting to see how he evolves from a young budding plant into the yummy edible sage!

Next up is my cilantro. He's doing quite well considering I've been told cilantro is tough to grow. Hes been attacked by mushrooms (which Dr. Oak so helpfully told me what to do when I did my mommy freak out) and he's doing well.

I also freaked out when I read I was supposed to soak the seeds of the cilantro first before planting... that didn't happen but these little critters survived my ditziness and they're alive and well. I garden by the Darwin philosophy... survival of the fittest.

The third picture is actually from a leaf we brought back from our honeymoon. Our tour guide gave us a leaf and told us to watch it sprout roots w/o dirt. It was impressive to see that it was alive after being smooshed in our luggage. It's thriving super well in the cold cold north.

There's also some basil in there. My company (a computer company...) had given us some basil 2 years ago and we planted and consumed some. Apparently we didn't plant this one bag since I found it in my desk when I moved... I figured there wasn't any harm in planting it now! It's doing quite well - a slow start but it's catching up now.

I purposely didn't take a picture of Bernie (my sad pathetic fern). I bought him on clearance and he's been dying a slow death ever since I brought him home. The hubster says hes dying because I named him Bernie. Sigh.

So there we go, the beginnings of summer! I have no real hope of consuming much of my plant children -- this year was more of an experiment more than anything else.

Are you planting anything? Herbs? Veggies? Cactus? I'd love to hear your plant stories!

Sunday, May 17, 2009

Tiramisu Cupcakes

I accidentally told Brian that my used craft sale was yesterday... nope...I accidentally messed up the dates. So he had to wake up early two days in a row (on a weekend -- the horrors!). As a way to repay, I decided to make him some tasty cupcakes.

Martha Stewart, my baking hero, is coming out with a new cupcake book. One of the recipes in it is a Tiramisu cupcake. It sounded tasty and once again, I needed an excuse to use the kitchen aide. Oh it's so pretty!

**Pic from MarthaStewart.com - I can't get a pic like that if I tried.

Once again, Martha didn't let me down. The cupcake was tasty and fluff-tastic! The coffee touch was great and it was cool to see it seep in. I would probably recommend just a little more coffee since it didn't seep as well as I thought it would. The icing -- well, I love me some mascarpone frosting and it was quite tasty.

All that said though, I will admit that there was a lot of work involved and I think you could find an easier base cupcake. While I understand the science behind beating an egg/sugar mixture over a pot of simmering water, there are easier ways to achieve a fluffy cupcake. Perhaps the Cake Doctor will have some easier suggestions for those of you who don't have 2 hours to make a cupcake...

Wednesday, May 13, 2009

"I Love Your Blog" Award

We received the "I Love Your Blog" Award from Passionate Eater a while back. Thank you so much. I'm such a fan of your site, and I always admire your appetizing pictures.

So it our duty to pass it along to seven deserving blogs that inspire us.


Here are my top seven picks:

1. Carding with a :-) a creative blog for the aspiring card maker. I'm a fan of her cards, but then again I'm not biased at all ;)
2. Scrapping On The Side another crafty friend who has some great ideas.
3. Who Da Monkey always something witty and funny to say, i like your style.
4. Talida Bakes an inspiring cooking/baking blog with beautiful pictures by a friend, who has the heart of gold.
5. Monk Eyelids I love tea and someone has to enjoy it and share it with the world! Go Eliezer!
6. I Dream of Desserts as a staunch follower of her previous blog (Cupcake BakeShop), we hope that you continue making wonderful desserts.
7. Crumby Icing my personal "Ace of Cakes" chick who is not afraid to try something big and scary.

I hope you continue to blog, because I read you all religiously. If you guys received this award, please pass it on to 7 other bloggers.

If Pudgey and Belinda want to award others with this "I Love Your Blog" Award, feel free to give them out. Spread the love :)

Wednesday, May 6, 2009

Bring on the Banana Bread

Banana Bread has always been one of my favorite quick bakes. It comes out moist, is not overly sweet, and tastes great warm or cold.

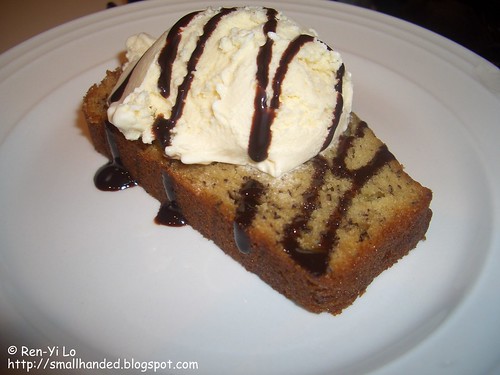
When two friends of mine were leaving the area, I wanted to make something special. However, our schedule did not allow me to host them for a nice dinner. Instead they swung by for an hour to hang out. Since I had some banana turning black, I thought banana bread was the perfect fast item to serve. I had just enough time to make it, so that when they arrived, I could serve up fresh-baked Banana Bread with Vanilla Ice Cream. Who wouldn't want to eat this?

In my attempt to rush all the ingredients together, I noticed that my oven was not preheating correctly. Evidently, there was something wrong with my oven and I quickly realized to my dismay that this was my first oven project since I've moved in to my new place. Duh--the oven was broken! But I was so determined to bake those banana loaves that I was ready to jump into the car and break into my parents house to bake these up, or "borrow" my neighbors oven. However, just as I was ready to put on those shoes, my little Black & Decker Toaster Oven was looking to innocently at me. Yep--it was the Black & Decker Toast Oven that saved my day. I "heart" you, lil Toaster Oven!

So this post is in honor of my friend, Karin, who will hopefully be able to make this in a real oven, with a little less crust on the banana bread ;)

Banana Bread

I made this recipe last week again (in a real oven) and here are my thoughts:
The banana bread came out moist and was just right with the sweetness level. I cut the sugar by 1/4 c, since ripe bananas are generally already very sweet. The bread also came out on the denser side, was less fluffy from another recipe that I have made in the past. This banana bread lack the height that my other recipe has, but the dense, short piece of banana bread seemed to complement the vanilla ice cream.

Banana Bread
adapted from Allrecipes.com, "Banana Bread I"

Ingredients:
* vegetable shortening, for greasing pans
* 1 1/2 c all-purpose flour (non-bleached)
* 1 tsp baking soda
* 1/2 tsp salt
* 3/4 c sugar
* 2 eggs
* 1/4 c butter, softened (equal to 1/2 stick butter)
* 3 overripe bananas
* milk (optional)

Directions:
01. Preheat oven to 350 degrees F.
02. Grease two 7x3 loaf pans.
03. Sift flour, salt, baking soda.
04. Place butter and sugar into a mixing bowl; cream butter with sugar on low speed.
05. Add one egg at a time, while mixing on low speed.
06. Mash bananas with a fork in a separate bowl.
07. Add milk, if the bananas are not ripe enough. The consistency should be mushy banana pieces and a little liquidy.
08. Add bananas to the mixing bowl; mix on low speed.
09. Add dry ingredient slowly to mixture; mix on low speed.
10. Once everything is incorporated, mix on medium speed for 1 to 2 minutes.
11. Split the batter into both pans evenly.
12. Bake for 35 minutes, or until toothpick comes out cleanly.
13. Remove pans from oven, and let stand for 10 minutes.
14. Remove from pans, and serve immediately.

Banana bread can keep up to one week, unrefrigerated. Just wrap it well in plastic wrap to keep it from drying out.
Banana bread can easily keep up to six months in the freezer. Just wrap it well in plastic wrap and place it into a freezer Zip-lock bag.

Friday, May 1, 2009

Meat and potatoes..

We had a 5 lb bag of potatoes and of course, while I was gone, the dear hubster didn't know what to do with them... It's not in a box... So when I got home, I had to come up with a fun way to use lots of taters. So Shepard's Pie it was! It's also a tasty way to squeeze in assorted veggies! Win win!

I'm in love love love with 30 minute recipes from America's Test Kitchen - as usual I modify it a little to add more veggies. For this one, I cut the meat in 1/2 and added a load of veggies I found in the fridge.

2 pounds of potatoes
3/4 lb of ground meat - technically you should use lamb but we only had ground beef
1/4 cup flour
2 cups stock
1 t Worcestershire
1 t thyme
1 onion
carrots
peas
peppers
assorted veggies
butter
cream

1. Cook ground meat until done. Drain and save 1T of oil. In the meantime, boil potatoes in water
2. Cook veggies and onion until tender. Add salt and pepper to taste
3. Add flour and stir until coated. Add stock, Worcestershire, thyme and bring to a simmer. Mix in meat until sauce thickens. Add veggies and simmer for a minute
7. Mash potatoes. Add cream and butter. I also used some sour cream as well for a little tang. Also put in some thyme in the taters as well.
8. Place meat and sauce into a baking pan. Dallop the mashed taters on top and spread. Spread a little melted butter on top and pop it into the broiler for a nice browning on top.

Saturday, April 25, 2009

A DIY wedding

So after many many months of planning and prepping, it's all over! I am officially a Mrs. Since much of the wedding was DIY, I figured I'd share some fun pics. If you've been following my blog, then you have already seen my wedding invites and save the dates so I won't bore you with those details again.

Before we being the DIY portion of this post I just wanted to say how I love love love how the flowers turned out. It had some pink and peachy orange roses mixed fushia stock. It also had some fun green accents - the green berries. The bridesmaids got a miniature version of my bouquet. (I'm sorry, I don't totally know the flower names - I'm horrible with those ;-) The colors worked so well with the bridesmaids dresses. The men's flowers were a little more eh - but its ok. No one looks at them anyways. ;-)

I made 2 different versions of the favors. You can see the close up of one in this photo and then the table shot has a picture of another one. I used Martha Stewarts favor boxes to create them. Using stamps from Beautiful Blooms, With Sympathy, Around and About Sentiments. I stuffed them with some Dove chocolates that I got during a post-Valentine's Day sale... heehee - don't you just love March weddings? :-)

The centerpieces were actually a last minute change. Originally I wanted to do something much more intricate. I ended up getting some dinner plates on clearance and some fun beads to rest the candles on. While not as "crafty" as I initially intended, it did give each table a sense of simple elegance. Candles are a little messy though - definitely lots of wax on the plates and bead things. But once again, the thrify bride knows that candles are cheap.

I showed the original template for the placecards I used but I didn't show any names or font choices. Some free digital files plus some photoshopping helped create a personalized place card that matched the flowers and the programs.

If I were to do the wedding all over again, I would never never never again do my programs the way I did them. I spent the last two days before the wedding basically in a certain commonly known print shop yelling at their incompetence.

Apparently even though some places claim to print on cardstock, they really don't. Or at least not the one in my hometown. I don't think I've been so mad before. If we were to call one moment a bridezilla moment, it would have been when I was inside this said printshop. They overcharged me 3 times the original price initially and while the test print was "perfect" (i.e. all my edges lined up properly), the final product was not.

So there we go! 1 year of my life and all I have to show for it is a few pictures. ;-)

Friday, April 24, 2009

All with some OJ

I've been on a business trip for the last week and a half. This usually means lots of eating out and when I get back home, I'd just love a home-cooked meal. Unfortunately for me, while the hubster has good intentions, he can't cook worth squat. Part of Operation "Food does NOT come from a box" is teaching him to make some simple meals.

Where to start? I decided to dig back into my college days when it was all about simplicity - and a can of OJ. ;-)

Orange Pork

1/2 C Orange Concentrate
Soy Sauce, Ginger, Salt, Pepper to taste
Pork tenderloins

Preheat oven to 475. Mix ingredients together and set aside some for later. Marinate pork in orange sauce. Place pork into baking dish with marinade and brush. After 15 minutes, turn and brush marinade again. Keep until done. Serve with remaining sauce.

Orange Chicken
1/2 C Orange Concentrate
Worcestershire sauce, cayenne pepper to taste
Salt, Pepper

Rub chicken with salt and pepper to taste. Mix the rest of the ingredients together and brush over chicken. Place chicken in oven - after 10 minutes, turn and brush the marinade over chicken. Keep in oven until done. Service with remaining marinade

Orange Carrots
Thinly slice carrots and place in boiling water until crisp and bright orange. Add honey, butter, ginger, and some OJ concentrate until desired doneness.

Smoothie
ice cubes
2/3 C milk
1/4 C OJ concentrate
honey to taste
splash of vanilla
banana

Mix and enjoy!

Sunday, April 19, 2009

Dress up those greens!

The other day I had set aside some chicken from dinner (before I even plated it) into a small tupperware. When the husband saw it as we were clearing dishes, he exclaimed that he didn't know there was more chicken. I asked him if he was still hungry and he said no... but it was good.

As a means of preventing the dear husband from eating too much (and getting the infamous midlife belly), now I consciously set aside a portion if I make too much. I'm going to start incorporating some simple salads before each meal since I've read that acidity helps control food portioning as well.

So I figured I'd share some of my favorite vinaigrette based dressings. I'm going to apologize for the lack of measurements - I make most of these to taste.

Apple Cider Vinaigrette
Apple Cider
Olive Oil
Apple Cider Vinegar
Cloves

Bring to boil some apple cider (apple juice works as well) and cloves. Add salt and pepper to taste. Remove from heat and mix with vinegar. Mix the olive oil in.

Citrus Vinaigrette
Olive Oil
Citrus juices (I've used grapefruit, lemons, limes, orange - really whatever I have on hand)
Apple Cider Vinegar

Mix the vinegar with the citrus juices well - add olive oil. Salt and pepper as needed

Honey Garlic Dressing
Olive oil
Apple Cider Vinegar
Honey
Garlic, minced

Take the garlic and add some salt. "Smoosh" to create a paste. Mix garlic paste, honey and vinegar together. Add oil in.

Do you have any favorite dressing recipes? I'd love to hear them!

Wednesday, April 15, 2009

Molten Cake

Heehee, I'm a smallhanded person too! I figured I'd start my first post with a recipe for Kahlua molten cake. You can never go wrong with chocolate and booze... right? ;-D

I based this recipe off of a recipe from Everyday Foods (my favorite source of simple recipes). We made a variation of this while I was still in NC so I knew it wasn't too complicated. I wanted to christen my new Kitchen Aide** with a tried and true recipe.
  • 2 tablespoons unsalted butter, plus more for ramekins
  • 1/3 cup confectioners sugar, plus more for ramekins and serving
  • 2 ounces semisweet chocolate, broken into pieces
  • 1 large egg
  • 1 large egg yolk
  • 1 teaspoon Kahlua (we used a hazelnut Kahlua)
  • Pinch salt
  • 3 tablespoons all-purpose flour
Prep two ramekins (or small little cake pans or something...) and preheat oven to 400
Melt chocolate and butter together. (Although I'll admit that I actually only melted the chocolate and then creamed the butter... still tasty)
Mix sugar, egg, yolk, kahlua and salt in small bowl. Whisk in chocolate mixture.
Whisk in flour until just mixed - important not to overmix. Pour into ramekins.
Pop the suckers into the oven (400 F) for about 10 minutes. Your favorite poking utensil should come out clean on the edge and not so much in the middle.

Eat quickly with some tasty whipped cream. Letting it sit too long means less molteny more cakey...

**Disclaimer - the cake disappeared before we could take a pic... sorry dudes. Just imagine chocolately goodness

**The stand mixer is not necessary (or even recommended) for this recipe. This post writer just loves her mixer!

Monday, April 13, 2009

Welcome to Another Smallhanded Chick

Pudgeykins and I would like to welcome our newest small-handed friend to our blog: cadnileb. If you stalk her other blog you will quickly be amazed by how talented she is. In addition, she recently became a Mrs, and is now on a new mission to feed her hubby delicious things not from a box. So we've invited her along to post her newest discoveries.

So for the few readers out there that have been craving more posts -- ha! we've solved your problem ;)

Monday, January 19, 2009

Momentary Lapse of Silence

For you few & loyal fans out there, we small-handed gals have not dropped off the face of the earth! Quite the contrary, this has been a very busy start of the year. I will be moving soon (yes, yet again *le sigh*) But excitingly, I have found an reasonably-priced apartment and will be sorting, trashing, and packing like a Tazmanian Devil.

The other small-handed girl has been stuck in lab, working like a mad scientist, to produce some data that will hopefully allow her to make her mark in the biology community. ;)

On a blogger's note, I have found a not so painful way to watermark my pictures. So there should be more things uploaded in my flickr stream shortly. Also look out for a new and improved blog page, as my very artsy, desginer brother helps us create our blogger's image.

Friday, January 2, 2009

[Hong Kong] Persimmon, the Orange Tomato Fruit

My parents introduced me to the persimmon when I was very young. We did not have it often, since they were very expensive and hard to find in Europe. I just remembered that I was very confused, because it looked like an orange tomato with some weird leaves that had to be yanked off, and my parents kept calling it an "orange tomato fruit."

Tomatoes were always regarded as vegetables in our household, so why was this a fruit? (Never mind the biologist's argument that tomatoes are fruit for now). So this "sweet vegetable" was a fruit, lacked the fluid, seedy chambers of a tomato, but had a similar skin and flesh texture.

I was re-introduced to this fruit again by a coworker in 2004. She was very generous to share these with me and I was instantly hooked on these "orange tomatoes." Her culture calls it the "Sharon Fruit" and my grandmother calls them shì zi (柿子).

There are two kinds of persimmons: astringent and non-astringent.

Astringent persimmons contain high levels of tannins, which is responsible for the dry, puckering aftertaste when consuming unripe fruit. Therefore, astringent persimmons should not be consumed until they are ripe and soft; they should feel like overripe apricots or peaches. The ripening process is what rids the high levesl of tannins. The most common persimmon is the Japanese persimmon, recognizable by its distinct heart-shape body. Trying to eat them before they are ripe gives off a chalky and displeasing aftertaste and texture in the mouth. I speak from experience ;)

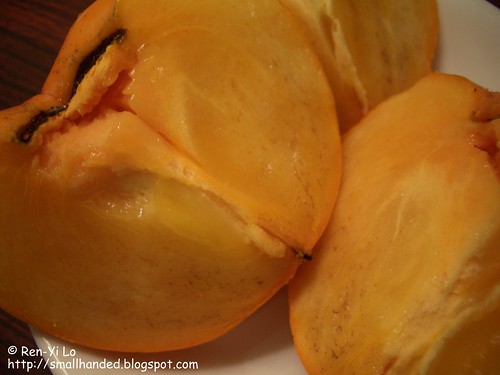
Non-astrigent persimmon (my favorites!) are less fussy about when they are eaten, since they have low levels of tannis. I like them when they are still firm and waxy on the outside, since they are crispy like an apple on the outside, yet fleshy and not mush like pumpkin pulp. However, consuming them while they are over-ripe is also fine. The most common persimmon have no tip like its Japanese cousin; instead it is squat like a beef-steak tomato and often also have the label 'fuyu' when it is sold.

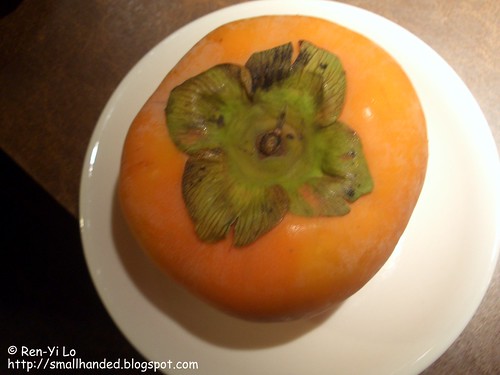
While perusing the grocery stalls in Hong Kong, I could not resist picking up one of these.
Fuyu Persimmon

Fuyu Persimmon


We enjoyed this persimmon chilled. And although my parents were hesitant about consuming this persimmon while "unripe," with some coaxing they enjoyed this new way, since the fruit tasted crisp, fresh and light, and was less messy. :)

Today persimmons can be easily found in any major grocery store during the winter months and almost year around at any Asian grocery store. If you have not tried them, you are in for a treat. Let me know what you think!

2009: Here We Come!

Happy New Year, everyone!
from us on smallhanded.blogspot.com

Related Posts with Thumbnails