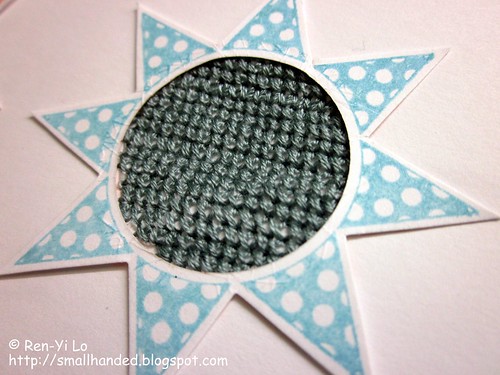
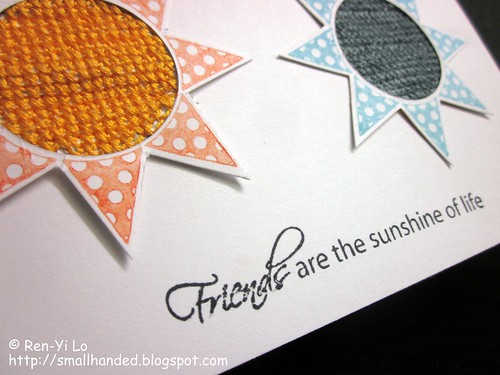
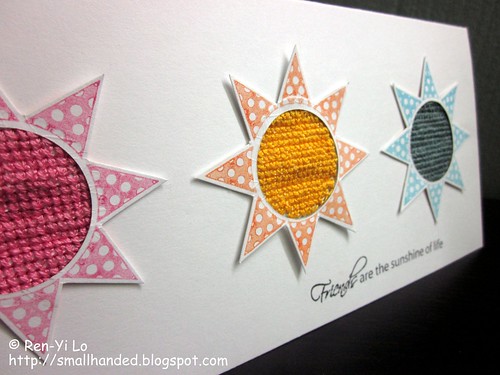
Today's preview at The Craft's Meow July Release is a large sheet that will give anyone an excuse to create cards. The sentiments on this set are sweet and dear that you can send to a mom, a friend, a sister, a co-worker, a teacher, a kid...you get my point ;) It's a Michelle Bertuzzi stamp set called Baggin' Some Rays and its release can't be timed any better - perfect to celebrate our summer season.
In fact, when I saw this stamp set, I already knew what I wanted to do. I just had to go sit down and make this card...read on to hear how this sweet, simple card turned out to be the card full of nightmares!

Stamps: (Nina B Designs - Baggin' Some Rays) The Craft's Meow
Paper: Paper Basics Card Stock - White) Papertrey Ink
Ink: (Perfect Match Pigment Ink - Raspberry Fizz, Orange Zest, Hawaiian Shores) Papertrey Ink; (Memento - Tuxedo Black) Tsukineko
Embellishments: (#742 - Light Tangerine Thread; #3806 - Light Cyclamen Pink; #926 - Medium Gray Green) DMC; (Nestabilities - Small Classic Circles) Spellbinders
WARNING: This is a CAC card. Clean And Complicated card, not very CAS. I really enjoyed making it until I realized how much work this was. Here are the steps:
- Stamped the center of the sun onto a scrap paper; cut it out
- Stamped center of the sun onto the white card stock with Versamark after measuring out the spacing
- Lined up scrap paper center with stamped Versamark center
- Placed plastic cross-stitching canvas over the circle and paper pierced a grid onto my white card stock
- Rinse & Repeat last two steps for the other two centers ;)
- Grab floss and start cross stitching each center
- Cross-stitch some more
- Cross-stitch yet some more
- Take a nap
- Cross-stitch
- Go to work
- Cross-stitch; get fed up; stamp the rays and cut out; die cut centers out

I was kidding on the blood, but I did prick myself a few times, cause card stock is stubborn! Here a few things to keep in mind:
- I had a small grid and used two strands of floss. The small grid gives good coverage (no white card stock showing). The larger the grid, the harder to cover the white space, unless you add more floss, but card stock buckles and tears.
- Card stock is no Aida cloth. The more the card stock gets stabbed and pierced, it loses stability and integrity. I could feel how the centers got very soft after I reached the half way point. Kinda like paper that has been set out in damp weather...
- The smaller the grid, the more time-consuming. Really ;) Take your time estimate and triple or quadruple your time. A friend asked how long it took to create the centers and I thought was about 45min. I was cross-stitching while listening to Bones in the background. Four episodes in, I was still stitching on the same center - and each episode is about 43min. 'Nuff said.
- I'm usually not such a snail when cross-stitching, but cross-stiching on paper is naturally slower - no tugging, no pulling fast, holes aren't pierced perfectly...
- And it goes without saying that one should make all the x's go in the same direction. It gives it that clean, uniform look...*smile*

So I hope this blog post was informative. It's my Lessons Learned that I wanted to put into a blog post to remind me not to underestimate the time needed to execute some ideas.

But onward to fun things - if you would like to win this fun stamp set, get your summer spirit on and leave a little love on each of the DT's blogs. You never know from whose blog we'll draw a lucky winner. You'll have until 10:00 pm Pacific tonight / 1:00 am Eastern tomorrow to make the rounds and leave comments.
You'll want to see how each Design Team member interprets summer...! What things are you looking forward to this summer?

20 comments:
Hi Ren-Yi, what a fun card!! Love it!! It's hard to choose the sets because I LOVE them all. Wishing tomorrow would come sooner ;)
Great job on the cross stitching centers - it was well worth your effort. This is a beautiful card and would cheer up anyone's day!
This is truly amazing! I absolutely love the cross stitching! The result of your hard work is well worth it. Love this card!!!
Beautiful! love the centers of your card!
Wow, sounds like something I would never have the patience for! But this turned out so beautifully!!! Very creative idea ;)
Fellow cross stitcher here and your card is adorable!!
Tracy
www.scrappininthewoods.blogspot.com
Looks amazing, thank you for your hard work, it really has made me smile :)
Fabulous card and funny story--thanks for all the tips.
Amazing card, awesome job on the cross stitching! TFS
what fun!
tfs
Gorgeous!! Yeah, this looks like it was complicated, for sure. But it is SO pretty and clean! I love the colors you used, and the long shape of the card looks terrific. Great way to show off this fun new set!
WOW! Love the fabric centers!
Oh my goodness, girl, your comments crack me up!! And the time it took to make this must have been loooong!! The card looks great, and maybe IF you ever decide to do it again, just use Aida cloth and tape it to the back of the cut-out centers (and thanks for the warning so the rest of us don't try it on paper :) BIG hugs!!! You've done great on these previews. I've enjoyed your great creations:) :) :)
Such a wonderful card. I loe the cross stitching in the center of the stamps.
Wow - that's a lot of work for one card but it looks SOOOO GOOD! I love the stitched centers.
--Cheryl--
Stop by my blog to check out my blog candy!
Sweet card and a fabulous tutorial as well. Great design!
So Pretty! Love the cross-stitch centers!
Um wow. When you said cross stitch, I was thinking a few simple x's or something. This is insane! Just lovely though!
Great job! Well worth the work! But I am lazy and would probably just stamp the centers :)
Awwwh poor thing! ;o)) Awesome card!! Hope your finger recover soon ;o)) xx
Post a Comment