Tuesday, August 31, 2010

Sending Smiles

Claire from Waltzingmouse Stamps has something up her sleeve and I feel like a kid counting down the days until Christmas. The days always seem like months away, because the anticipation and excitement kept building, as my brother and I use to guess what Santa would have brought us. So, what does an anxious kid do to pass the time? Find distraction.

What better distraction then to play along with the next Waltzingmouse Sketch Challenge. Check the deets out:

I've been meaning to send a RAK across the big pond to someone who has been unwell. And while recovering from my little surgery, I kind of purchase some new stamps to distract myself. I blame it on being under the influence of pain killers ;) So as soon as they arrived, I knew exactly which ones I'd use to cheer my friend up.
Sending Smiles Across the Miles
Stamps: Up, Up and Away, Polka Dot Basics (Papertrey Ink)
Paper: Key Ingredient Kit - Petals & Paisley (Taylored Expressions); Basic Card Stock - White (Recollections)
Ink: Versamark (Tsukineko); Earth Elements - Creamy Caramel (Stamping Up!); Pigment Ink - Red (Recollections); Perfect Match Pigment Ink - Fresh Snow (Papertrey Ink); Momento - Summery Sky (Tsukineko)
Embellishments: Rustic Button Twine - Jute (Papertrey Ink); Steel Dies - Up, Up and Away, Cloud 1 & 2 Die Collection (Papertrey Ink)

I was such in an hurry to take a picture that I didn't realize my cloud trying to float off my card. I made sure to glue it down before I sent it across the ocean. Isn't it a little punny that I was sending a hot-air balloon via "Air Mail"? A little situational pun humor.

Friday, August 27, 2010

Birthday Wishes - It's For all the Marbles (or Bellas)

Stamping Bella were one of my first-bought stamps (not at a paper crafting event) - and I was super excited when looking through all of them at Stamp Fanci in Pittsburgh. I remember Belinda saying non-chalantly "They also carry Stamping Bellas" and all I remembered doing was dropping the gems I was ogling into my basket to move on to better and bigger things. It was really hard not to walk home with all of them, but I left with cakeabella, presentahbella, beerafella, jammybella, kittycattabella, and mwahbella with words. The rest is history. Did I mention it was Belinda (my dear Bleu Bella) that first introduced me to them?

So Em's Bellarific Babes are on the lookout to add to their babe count. And I have been diligently inking up my first obsessions. My Bellas definitely needed an excuse to party more. This week's Bellarific Friday theme: anything, just give them your bestest shot at a card.


Birthday Wishes
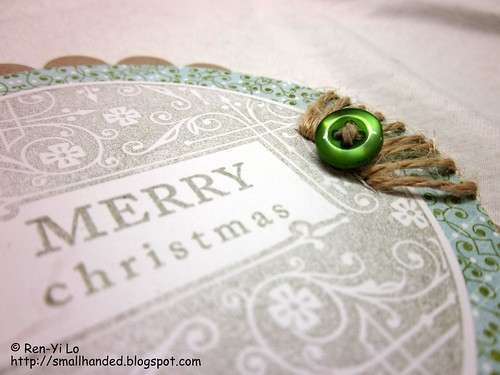
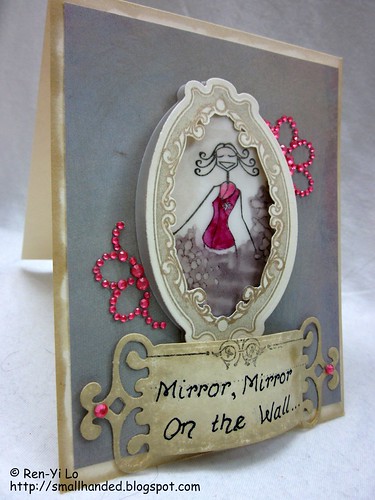
Stamps: cakeabella (Stamping Bella); Fancy Phrases, Very Vintage Labels No. 4 (Waltzingmouse Stamps)
Paper: Paper Basics Card Stock - Dark Chocolate, Kraft (Papertrey Ink)

Ink: Earth Elements - Chocolate Chip (Stamping Up!); Pigment - Black (Colorbox)
Embellishments: Jewel (Memory Box); Creative Candy - Pretty Pearls: pink (Amuse); Nestabilities - Small Labels (Spellbinders); Softcore Colored Pencils - PC942 Yellow Ochre, PC946 Dark Brown, PC929 Pink, PC935 Black (Prismacolor); Double-ended Art Markers - Goldenrod

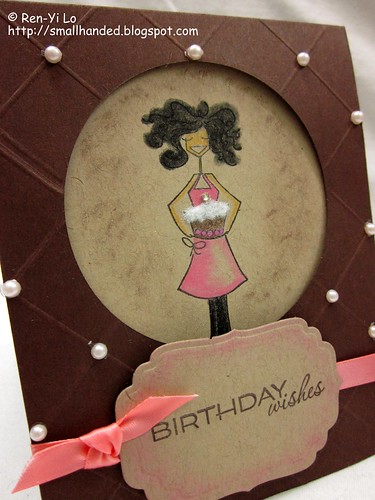
I'm not sure if this is the bestest, but I wanted to do a birthday card and had someone in mind for this. And it came out the bestest composed card for this very dear person.

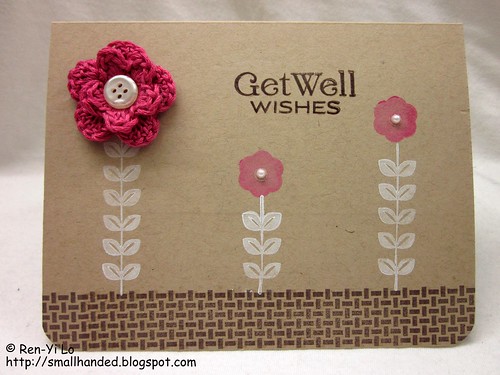
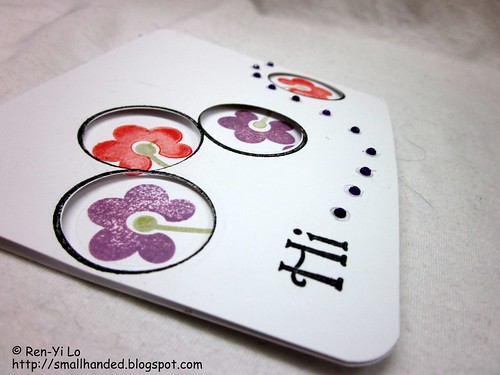
I have been itching to make a window card again. So a circle was cut out using my trusty Nestabilities to allow cakebella to peek through. 
The rest of the card is scored in a diamond pattern, and each intersecting line has a little pearl.

Since the candle was hiding I had to add a little bling to bring that out. I also wanted to play with flock again for the cake, and I believe it came out a lot nicer. The key is loads of glue surface. Just when you think you have enough glue, add more for some good measure. And then dump half the flock and squish, squish, squish it together. The more compact, the fluffier, the better!


Birthday Wishes

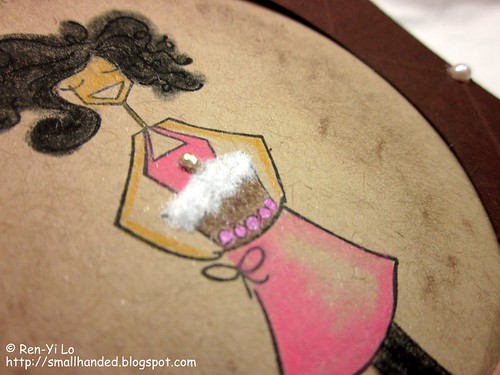
This reminds me of the scene in "Despicable Me" where Agnes says "It's so fluffy, I'm going to die!" If you're giving me blank look, check this youTube clip out. Now do you remember? Wait -- you haven't watched "Despicable Me"? Then why are you still reading this blog post? Go, hurry, run and find the next movie theater and drag your kids - and yes, a must in 3D! You'll be rolling in laughter 'til your sides will ache with stitches.

Anyways - back to the card. Now that I think of it - it's a very girly card. Bling, Pearls and Pink.

So, here is wondering if my entries are worthy of a shot at being the next Bella Baberooni. I certainly had fun pushing myself to try something new. And if not this time, maybe next time!


Thursday, August 26, 2010

The Cow Goes Moo

So this week at Embellish Magazine, this really fun company Lawn Fawn is sponsoring. I made a huge red circle in my calendar to make sure I entered a card for this one, because I really adore this company. I have been drooling over these Lawn Fawn stamps for a while, and have yet to place an order. Not to mention, when you meet the amazing Kelly Marie, how can you not love her stamps even more?! She had a very cute outfit on that complements her personality. Check out the pic I stole with her - I was tickled she took the time out. Thanks, Kelly Marie, for sponsoring this round.

Lawn Fawn's Kelly Marie

So, in honor of making her proud with this week's Embellish Magazine's Challenge, I came up with a cute barn yard animal card. Here the deets on the challenge:

So, what does one do with new stamps that have been dying to be inked up? Take them out and love them with loads of ink, of course! My Unity Cosmo Garden Variety are the perfect cutesy stamps and fit the "New Stamps Need Love" campaign.

The Cow Goes Moo
Stamps: Garden Variety (Unity + Cosmo)
Paper: Paper Basics Card Stock - Kraft (Papertrey Ink); Key Ingredient Kit - Petals & Paisley (Taylored Expressions); Basic Card Stock - Cream (Recollections)
Ink: Pigment Ink - Black (Colorbox); Brilliance - Pearlescent Beige (Tsukineko)
Embellishments: Softcore Colored Pencils - PC1011 Deco Yellow, PC924 Cream, PC939 Peach (Prismacolor); Special Value Ribbon (Michaels)


This stamp set had me at "Squeeze Me" and the Tomato, but "The Pig goes Oink" is pretty classic too, don't you think?

The Cow Goes Moo

After I had a blast making this card with my little folded ribbon, and showed it off my to my house guest, he asked "And who would be the recipient for this card?"

Yeah good question. A baby? A kid? A random hello? I'd love to hear how you would classify this card...

Tuesday, August 24, 2010

Merry Christmas

First off - thank you all so much for your well-wishes and prayers. Surgery went off without a hitch and I did not have any scary anesthesia issues. Recovery was painful and tough, but with all the prayers and good thoughts coming my way from all of you, I managed to get through 3 1/2 days of pain. My doctors were even nice enough to schedule my stent removal a day earlier - to put me out of my misery. So a few more days, and I should be back to my lil' old self.

So on to more fun things? It's already August and I have not really started on any Christmas card. So I dug out my Eskimo Kisses pattern paper from Basic Grey and drew my inspiration from one of the pattern papers.

And since one of my addictions is to play along with with the Mischief Makers on the next Waltzingmouse Sketch Challenge, I had better get crackin'. The sketch deets:

Did I mentioned I was not in the mood to do red/green color combo? So when leafing through my pattern paper pad, one of the pattern paper sheets struck my liking and this is how it all came together.

Merry Christmas
Stamps: Vintage Circles (Waltzingmouse Stamps); Mega Mixed Messages (Papertrey Ink)
Paper: Paper Basics Card Stock - Kraft (Papertrey Ink); Eskimo Kisses (Basic Grey); Basic Card Stock - White (Recollections)
Ink: Earth Elements - Old Olive (Stamping Up!)
Embellishments: Jute Packaging Twine (Westim Crafts); Hemp Cord (Darice);  Vintage Buttons- New Leaf (Papertrey Ink); Nestabilities - Classic Scallop Circles Small, Standards Circle Small (Spellbinders)


Weaving the twine was easy enough with a yarn needle through a slit that was made with an Xacto knife. Forget trying to hand-weave it -- too much of a struggle ;)

Merry Christmas

Also, remember to pick out two matching buttons first if this is important to you, or else you'll end up dumping the entire jar trying to weed through and match the one you already attached. Well - let's put it this way, I had enough time to admire all the fun shapes, finishes and sizes of every button, to the point I was sighing and realizing how sold I am on my Papertrey Ink buttons.

Are you a believer in those Papertrey Ink buttons? If not, where do you buy your stash of buttons?

Saturday, August 21, 2010

Happy Birthday, Little Brother

Happy Birthday, Lil' Bro! My brother isn't really that little anymore. He has graduated college, and is a working man! Part of the big, real world - the kind with bills, a job with benefits, and other fun, new responsibilities. My first response after he broke the great news to everyone at home of his new job was "Have you set up your 401K account?" Poor boy.

Anyways - regardless how grown-up he is, he will always be my little brother. The only difference is that I can gift him a card that isn't PG-13 anymore ;) His true loves? Good food, good beer, anything electronic and gadgety.

So the most appropriate stamp to pull out? Beerafella. In addition, the next Bellarific Friday theme has the following sketch

Birthday cards must be fun and colorful. And while looking through my pattern paper stash, I remember my trusty Cosmos Cricket pad. So, here is what Beerafella & I came up with:

Happy Birthday
Stamps: Beerafella (Stamping Bella), Wonderfully Whimsical (Papertrey Ink)
Paper: Paper Basics Card Stock - White (Papertrey Ink); Boyfriend (Cosmo Cricket); Basic Card Stock - Cream (Recollections)

Ink: Earth Elements - Creamy Caramel, Not Quite Navy (Stamping Up!); Tea Dye Duo - Chamomile (Papertrey Ink), Momento - Summery Sky (Tsukineko)
Embellishments: General Purpose Thread - Grey (Coats & Clark); Flock - White (Stampendous!); Nestabilities - Small Labels (Spellbinders); Softcore Colored Pencils - PC924 Crimson Red, PC911 Olive Green, PC939 Peach, PC1027 Peon Peacock, PC946 Dark Brown (Prismacolor)


My fun element was to flock the outline of the clouds with my newly acquired flock.

Happy Birthday
Improvements can definitely be made, since the flock looks a little whimpy for the manly card this was suppose to be. More adhesive and loads more compacting down the clouds. But this might quickly become a fun favorite texture embellishment.

Have you played with flock? What are your favorite uses?

Wednesday, August 18, 2010

Wendy, the Friendly Neighborhood Witch

Have you met Wendy? She is my favorite witch, but don't tell Wanda (or is her name Winnie?) Perhaps Claire can help clear up my confusion...

The point really is that I played along in this week's Waltzingmouse Sketch Challenge and I liked the simplicity of it. I will let you judge, but I bet you will agree.

So Wendy wanted to sparkle, and she told me that she loves pink. Sweet Wendy, therefore, got her wish.
Happy Halloween
Stamps: Midnight Feast, Victorian Fripperie (Waltzingmouse Stamps)
Paper: Paper Basics Card Stock - Black (Papertrey Ink)
Ink: Versamark (Tsukineko)
Embellishments: Stamp 'n Stuff Embossing Powder Clear - Detail (Stampendous!), Gemstones (Hero Arts), Essential Color Glitter Set - Kunzite (Martha Stewart)

Now, I do have a question for you snazzy photo experts. I have most of my other card taking figured out (proven by the less crappier pictures taken lately). But with Wendy over here, I had a heck of a time getting pictures of the black card stock and the clear embossing. 

Happy Halloween

I took the picture in the same halogen-lit room and adjust the lighting on my camera; I tried soft-yellow light bulbs and adjusted the lighting on my camera; I tried indirect light; but my card always came out light gray, funky, no embossing, way too dark. So I opted to take a little stool into the garden and take a picture of Wendy during the day. This is the best I could do. But what disturbs me is that it's not a true black. The real card looks so much richer and darker. 

For the record, I have a Canon Powershot SD1300 IS. Any and all advice very much appreciated.

Get Well Wishes

Have I mentioned how excited I am to start as a full-time Scrap our Stash DT Member? So much that I wanted to celebrate with you all and send out some candy to everyone that participates in both the August Flower challenge and the Pagerize This #1 challenge.

So, hurry off and go create something. If you need inspiration for the August Flower challenge, I suppose I could share something ;)


Get Well Wishes

This flower was made using a tutorial posted by Nichole Heady's blog. I have totally fallen in love with these flowers and as a crochet-avid love how simple these are. The DMC floss is also perfect, since they are cheap and varied in color. These flower embellishments can be simple or decadent, depending on how their centers are chosen.

Get Well Wishes
Stamps: Pic-Nic Patterns, Fancy Phrases (Waltzingmouse Stamps)
Paper: Paper Basics Card Stock - Kraft (Papertrey Ink)
Ink: Earth Elements - Chocolate Chip (Stamping Up!); Perfect Match Pigment Ink - Fresh Snow, Raspberry Fizz (Papertrey Ink)
Embellishments: Crystal Stickers Strip - White Pearls (Mark Richards); Vintage Buttons - White (Papertrey Ink); Embroidery Floss - ? (DMC); GellyRoll - Glaze Clear Opaque (Sakura)

So, now it's your turn. Remember, that if enter both the August Flower challenge and the Pagerize This #1 challenge, I will send you a little surprise participation candy. Just leave me a comment on this post and how to get in touch with you.

Tuesday, August 17, 2010

August Vintage Waltz with Waltzingmouse Stamps

The monthly installment of the Waltzingmouse Blog Waltz is on! Thanks for stopping by! This time the theme is Vintage/Shabby Chic. If you heard a loud groan across the ocean, Lisa & Claire, that was me! Most of the time when people ask me what I do outside of work, I will say paper crafting (signs I'm an addict, since my default answer use to be knitting and crocheting - for my paper crafting friends that read this blog, i hear you snickering and grinning shameless-ly. Shame on you!). The conversation usually stops there, but then in some cases the conversation continues: "Oh lovely, what is your style?" ::dead silence::

I generally glue a bunch of things together and it comes out somewhere between clean & simple, sometimes even with a touch of cute & whimsy. I definitely cannot wrap my head around shabby, and only recently did I try to ink up my card stock or tag edges to create a "light vintage" look - but that too still makes me head hurt. These styles are not intuitive to me.

I read "Vintage Chic" and out came "Whimsy Vintage Chic" (if that even exists) --read on to see how it morphed to this:

Mirror, Mirror On the Wall...
Stamps: Very Vintage Labels No. 10 (Waltzingmouse Stamps), Victorian Fripperie (Waltzingmouse Stamps), jammybella (Stamping Bella)
Paper: Paper Basics Card Stock - White (Papertrey Ink), Basic Card Stock - White (Recollections), Vellum (?), Pattern Paper - Gray (Memory Box)
Ink: Pigment Ink - Black (Colorbox), Pigment Ink - Gold (Recollections), Brilliance - Black Graphite (Tsukineko), Vintage Touch - Chamomile, Chai (Papertrey Ink)
Embellishments: Rhinestone Stickers (Recollections), Nestabilities - Fancy Tags, Labels Ten (Spellbinders), Double-ended Art Markers - Mulberry, Pink, Warm Grey 50%, Warm Grey 30% (Prismacolor)


Claire has loads of stamps with Vintage in the name, so choosing one of those must be a good first step. Since I was playing with the Label Tens for a previous card, they reminded me of Waltzingmouse's Very Vintage Labels No. 10 -- the first obvious stash choice.  And I have had this obsession that some of the stamps look like mirrors.

Gold and Tans seem to be Vintage 101 elements.  And my newly acquired Fancy Tags also helped as an anchor point for the mirror. The best part was that my Papertrey Ink purchase at CHA could not have been timed better: the Tea Dye Duo set came in super handy to make the card look vintage-y.

The mirror was cut out very carefully using an exacto blade and got a quick outline with a golden sparkly gel pen. This seems to accentuates the gorgeous designs of the mirror frame, and thus a fancy mirror was born. Now for something mirror-worthy to frame ...

jammybella without her jammy pants was perfect to stick into elaborate mirror. With her arms off to the side, and her self-confident expression - perfect for someone who would ask herself "Mirror Mirror on the Wall, Who is the Fairest of them all?" Don't you think? ;) No one needs to know that she has a teddy bear in her other hand and really cute girly jammy pants ...

jammybella is stamped on Vellum, since the sheer texture was mirror-like. I tried to add "smoke" around her since I didn't want her to seem like she was mid-air floating without legs. Too hard to tell from the picture, but the vellum was also backed with a piece of cream card stock that was partially vintaged with Chamomile to add depth.


Mirror, Mirror On the Wall...

Lastly, Chic means Bling, right? ;) I actually decided to give jammybella her pink top and add the pink bling (a dissected flower) around the mirror, because of the hint of pink traces in the gray pattern paper.


The sentiment is unfortunately hand-written, since I didn't have the energy to go  set up the printer. I mimicked Claire's Victorian Alphabet font the best I could. Victorian is after all vintage-y, right?

Well I hope this shed some light on how I pushed the boundaries to come up with something vintage chic. Does it work? Is the bright pink and the vintage paradoxical?

So those that have peeked over here for a while, I'd love to hear what kind of style you would categorize my work. Or is it too early to tell?

Sunday, August 15, 2010

Scrap Our Stash News

I have exciting news to share! Kathy, who runs a challenge blog "Scrap Out Stash," has invited me to stay on as a Design Team member! I'm thrilled, because 
  • this was the first blog I submitted a challenge entry (and won ;) - thanks to a little pushing and shoving from Steph
  • love the girls who are passionate about their craft
  • the gals are extremely encouraging, especially when one starts out learning techniques and styles
  • my two Swapping Sisters, Laurie & Steph are part of this fun gang
  • this is a terribly useful group - they encourages you to use up your stash, have neat frugal tips & tricks up their sleeves, and throw out fun challenges
I'm just overjoyed and cannot wait to get to work! Kathy, I hope I make you proud!

I hope you'll join me on my adventures. August turns out to be half way over, but there are plenty of fun things going on:
  • Check out the August Challenge - it's as simple as use flowers on your project. If they are hand-made, that's even better.
  • A new & exciting type of challenge - "Pagerize This!" Wouldn't you like to be the first one to win one of these?! Winners get bragging rights and a chance to be the next "Pagerize This" Designer.
So, come on over and give it a go! I want to see what you have up your sleeves... I might even send you a little surprise if you enter both challenges...

Thursday, August 12, 2010

Thinking of You


Aren't the colors just divine in this next Embellish challenge? I want a coat in that style! But I detract. The challenge is to include a bird. Birds made me think of the saying "To kill two birds with one stone," which brought me to the brilliant idea of combining it with this week's Waltzingmouse Sketch #9:

My card turned out to be a very lose interpretation of this sketch, but I hope the elements are still recognizable.


Thinking of You
Stamps: Asian Gardens (Waltzingmouse Stamps)
Paper: Paper Basics Card Stock - Avocado (Papertrey Ink), Porcelain (Basic Grey)
Ink: Earth Elements - Chocolate Chip (Stamping Up!), Versamark - Watermark (Tsukineko)
Embellishments: Embroidery Floss - 3806 (DMC), Vintage Buttons - Brown (Papertrey Ink), Nestabilities - Labels Two (Spellbinders), Taylor's Tiny Twinkles - Multicolors (Taylored Expressions), Craft Punch - Hydrangea (Martha Stewart), Stamp 'n Stuff Embossing Powder - White Opaque (Stampendous!), Fine Point Correction Pen (Pentel)


While making this card, I realized I was missing a crucial element in my tools: a white gel pen! How does one do faux stitches?! Well - I found a correction pen lying around in my stash. It kind of work, but my stitches aren't as neat as I would have hoped.

Thinking of You
A fun element was to mimic the border of the card to be a Label Two. So off I went to tracing the largest Label Two Nestability. After a little fibbing & eyeballing, I had something that I could live with.

Time to rest my little bird-brain and peruse some blogs...Have a great evening!

Wednesday, August 11, 2010

Presenting Presentahbella

Ever heard of the Bellarific Baberoonis? It's the talented pool of bellarific bellas that help Em showcase her fun & whimsy stamps. My favs are her Bellas and Fellas, but there are plenty of other adorable lines. Just go see for yourself!

They have Bellarific Fridays and is just another fun place to play along. The theme for last Friday was Paper Piecing, and I thought it'd be fun for my Bellas to play along! So out came Presentahbella...


Celebrate
Stamps: Presentahbella (Stamping Bella), Asian Gardens Additions (Waltzingmouse Stamps)
Paper: Paper Basics Card Stock - Black (Papertrey Ink), Paperie Poolside & Greenhouse (Making Memories), Basic Card Stock - White (Recollections)

Ink: Pigment Ink - Black (Colorbox), Earth Elements - Creamy Caramel (Stamping Up!), Perfect Match Pigment Ink - Terracotta (Papertrey Ink)
Embellishments: Kingfisher - Blue (Paperchase), Nestabilities - Labels Ten (Spellbinders), A2 Embossing Folder - Spots & Dots (Provocraft), Softcore Colored Pencils - PC935 Black, PC921 Pale Vermillon, PC927 Light Peach, PC1015 Deco Blue (Prismacolor), Point 88 - Art No. 88/46, Art No. 88/54 (Stabilo), Spool 'o Ribbon - 1/8" Orange (Offray), GellyRoll - Glaze Clear (Sakura)


I thought the circles in the stamp design would be fun to highlight. So I chose a pattern paper with circles. The blue in the pattern paper is subtle enough that it didn't fight with the circles of the stamp. After stamping the present and coloring in the circles, the next neat idea was to make Presentahbella's dress the opposite. A play on positives and negatives, and before you knew it, she was pieced together. Surgery on Presentahbella went well - no accidental amputations - and she quickly regained her color ;) Lastly, the base card stock is embossed with Spots & Dots to keep the circle theme going, which is a little hard to tell in these pictures...

Celebrate
The other fun part was using my newly-acquired-at-CHA Labels Ten! Overall a fun color combination - playful but still chic. Do you have Bellas? If so, which one is your favorite?

Friday, August 6, 2010

Good Luck

I'm on a business trip and had the biggest crafting withdrawal symptom. Since CHA I haven't had touched a paper cutter, glue or gotten my fingers inked up. The addiction to craft was quickly creating an annoying itch. And CHA was almost like a terrible tease -- all the great people, all the great products, so many materials and tools to swoon over, but very limited time to play with anything.

So yesterday, I was invited over to Nicole's place and a newly acquired friend, Sandra, came along. Last time the three of us met, we told her so much about paper crafting, that she was intrigued enough to express a polite interest but had a healthy dose of skepticism if she would get into it as a hobby. If I ever get a link to the first card that she made, I will have to post a re-direct to her and you (loyal readership) need to run over there and cheer her on.


Her card was AWESOME! It was a gorgeous wedding card - one where I would consider running out to find the next available bachelor so that I'd get that card as a gift ;) Just kidding...but the card was amazing. The design elements were just wonderful, her composition and color well thought out, and just sheer elegant. The best part -- she really loved paper crafting and we heard reluctant admittance that she could see herself considering a new hobby. (Score!) Heehee...Nicole & I infected her with the paper crafting bug!

While Sandra made her card, I was digging through Nicole's generous stash to create a quick card for a co-worker that is leaving the current project. His delegation is over and I thought I'd send him and his family off with a fun, fun card. I used as inspiration
 next Sweet Stop Sketch Challenge:

Forgive the pictures, but they were taken in different lighting at a ad-hoc setup in my hotel room.
Viel Glueck
Stamps: Snag 'em Stamps - Plane (imaginisce), Itty Bitty Backgrounds (Stamping Up!), Good Neighbors (Stamping Up!), Süße Sprüche (Stamping Up!)
Paper: Passports - Canada (reminisce), Basic Card Stock - Kraft (Stamping Up!), Basic Card Stock - Chocolate Chip (Stamping Up!)

Ink: VersaMark - Watermark (Tsukineko), Chocolate Chip (Stamping Up!)
Embellishments: Twill Tape (Stamping Up!), Tag Punch (EK Success), 1/2" Circle Punch (EK Success), 3/8" Eyelets - Metallic (Making Memories), 1/2" Corner Rounder Punch (EK Success), Top Note Big Die (Stamping Up!)


The scalloped border and the text circle tend to be girlier elements; therefore these sketch elements were substituted by small circles and a tag. The twill ribbon was a nice neutral/manly element, but needed some dots and brown ink to tone down the stark contrast. In addition, to give the card a little umph, the circles are raised at different heights. Perhaps this picture shows it better:

Viel Glueck
My co-worker was really surprised by this little random RAK and promptly displayed it on his desk. I'll interpret that as a win!

By the way, many of these elements are credited to brainstoming with Nicole. I can understand why crops with a table full of creative ladies are so much fun. It gets the creative juices flowing! Not to mention, I really have to give her a big shout-out here for preparing her wonderful home by laying out all the tools and papers, putting up samples as aids to explain to Sandra, and offering up her entire stash for us to use! Absolutely generous. Not only did I satisfy my crafting urges, but I really enjoyed a quality evening of great conversation & fun with Nicole & Sandra.

Wednesday, August 4, 2010

Goodbye CHA - Hello Real World

I made a trek out to CHA! More posts later about (I promise!), but can I just say now, I loved every moment?! The best part was meeting all the amazing gals. I think I haven't been this un-composed or high-school girl-like, since...ever?

Well, I'm on the road this week, so here is a quick card I had to make with my new CHA Exclusive Papertrey Ink stamp set. What better thing to use to prompt my creative juices, than the next 
Waltzingmouse Sketch Challenge?
The circles on the sketch created a hungering need to punch out circles on my top base card stock. And something needed to peek through, so a quick measurement of my circle dies and my new petals, resulted in this:

Hi
Stamps: Four of a Kind (Papertrey Ink), Victorian Fripperie (Waltzingmouse Stamps)
Paper: Paper Basics Card Stock - White (Papertrey Ink)
Ink: Perfect Match Pigment Ink - Plum Pudding (Papertrey Ink), Perfect Match Pigment Ink - Terracotta (Papertrey Ink), Pigment Ink - Black (Colorbox)
Embellishments: Nestabilities - Standard Small Circles (Spellbinders), Rhinestones (Best Occasions)


A fun little surprise after you open the card.

Hi
More pics on the flickr stream...

I am ready to go home; been on the road so much, that I had to go into a bookstore yesterday night and check out the "Crafting" section to look through books to get my fix. How do you satisfy your crafting urges when you're on the road?
Related Posts with Thumbnails