Sunday, July 11, 2010

The Best Business Trip - Ever

Business trips are generally short, stressful and rough. While I love meeting with my clients face-to-face (which some modern technologies cannot truly replace), it does throw a wrench into work-life balance. Some of my sudden whims can't be catered -- waking up to a brilliant asparagus idea, or crafting for sudden challenge deadlines. However, some things make it all the more worthwhile, such as finally meeting an online crafting buddy in real life!

Meeting a Crafting Buddy

Our mutual person that brought us together was actually her hubster. I had actually never seen this guy before in the office, and when I did meet him, the situation was as follows: he was describing punches & embossers to another dude in the office. So either Canada had a whole group of male stampers & scrapper (yeah right!), or I had just met the next Tim Holtz. To top it off, he had a Stamping Up! box -- maybe a surprise gift for a crafty wife or girlfriend? So the Nancy Drew that I am, I had to get to the bottom of this! Maybe this would lead to a "local" crafting buddy!

Our quick exchange resulted in him passing on his wife's super talented blog, which I have been diligently reading ever since then. She and Dana are quite the spit-fire Dynamic Duo! One comment on their blog, and a bunch of emails later, I had found myself an online crafting buddy. Unfortunately, our schedules never really aligned until recently, and after many weeks of patient waiting, we had agreed to meet. I was so excited, and to top it all off, I received this through her hubster:

RAK from Nicole
Inside this cute, bottom-reinforced carry bag, there was a beautiful card and a chocolate bar. The chocolate bar made for a great emergency emotional booster, since I had some intense meetings lined up that day, and the card was absolutely the sweetest.
RAK from Nicole
The card has a kraft-colored card stock base, and was watermarked with my favorites: flutterbies! The center piece is a cute vellum and pattern paper cut out of the same subject. What topped it off, was the cute gem brad, that held the flutterby on the card into place, and the flower onto the carry bag. The card was a quick note to express how much she was looking forward to our meeting. I, too, was equally excited about our meeting and was counting down the hours and minutes at work.

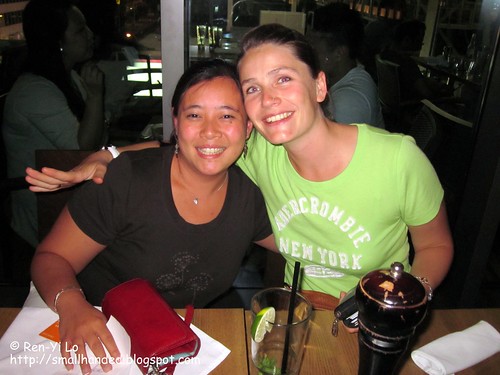
The funny thing was when we did meet for the first time, it felt like we had known each other for ages.

Isn't the crafting world just wonderful? It is such a great community to make new friends - close and afar!

Saturday, July 10, 2010

Best Fishes

I was generously offered a Guest Design Team spot for the month of July with Scrap our Stash. The July challenge theme is Brads & Eyelets. Ever have too many of those lying around?

My first thought for the July challenge using eyelets and brads as center of flowers, adding a few in a row to add extra bling, adding them to ribbon. But none of those made me excited and I wanted to do something special for Scrap Our Stash. So here I was going "Think Think Think" like Pooh bear. So while crafting on a different project, which included cutting out a cloud, I had my a-ha moment. Clouds are like "thought bubbles," which require little bubbles, but little bubbles remind me of "air bubbles," which led to fishies swimming. Totally logical, right? ;) 


Best Fishes Card
Stamps: Mega Mixed Messages (Papertrey Ink)
Paper: Paper Basics Card Stock - Kraft (Papertrey Ink), Dotted Swiss (Bazzill Basics Paper), Basic Card Stock - Cream (Recollections)
Ink: Perfect Match Pigment Ink - Terracotta (Papertrey Ink), Brilliance - Pearlescent Sky Blue (Tsukineko), Brilliance - Pearlescent Ice Blue (Tsukineko)
Embellishments: Emboss A2 - D'Vine Swirls (Provo Craft), Black - Art No. 88/41 (Stabilo), Softcore Colored Pencils - PC924 Crimson Red, PC1002 Yellowed Orange (Prismacolor), Heidi Grace Ribbon (Fiskars), Eyelets - Royal Blue (Making Memories)

Here are a couple of fun, planned elements to the card:

  • Embossed the kraft card stock and inked the raised parts with a stamp pad (a technique I spied off on the very talented blog of Claire from Waltzingmouse Stamps) to create water and waves
  • Used wavy ribbon to represent water waves, which also breaks the area of embossed and non-embossed card stock up well.
  • Used Swiss Dots Bazzill paper since "bubbles and dots" where kind of a theme.
  • Use your existing sentiments to make a better & punnier one. If you recognized the font or sentiment, you are probably thinking Papertrey Ink's Mega Mixed Messages. But  if you don't recall a "Best Fishes" sentiments in the set, I say "Look otherwise!" *wink wink* "Father" and "Wishes" in "Best Wishes" are of the same font type and same font size. So yep, through masking and careful placement of the stamp, one can create a new sentiment. Tada! This does not always work, but always look for opportunities. Remember this card? I isolated the "N" from a sentiment that ends with an "N" (e.g. "Good Man" or "Have Fun") to write out "Well Done 'N Good Luck." Gotta get as much mileage out of your stamps, right?
And then there are the usual unplanned mistakes and how-to "recover" hacks:
  • Used a Crop-A-Dile to punch out the holes and fasten the eyelets. Does anyone ever remember there is a guard? Duh. I had already glued down Mr. Fishy and the holes to punch out the air bubbles were absolutely no where near Mr. Fishy.  Oops. So i had to relocate Mr. Fishy a little more to the left. Good thing when I adhere I don't push and attach everything down, until everything is placed where I want it.
  • Mr. Fishy was drawn as a sketch on the scrap piece in an inked pen (my pencil was hijacked!), only he was too large. Oops. No big deal, turn the card stock around and start again ;) My Recycling 101, #1 Rule: if there is an "Oops", use the other side ;)
  • So, remember the Frugal Friday tip? My third "Oops" and "I should have practiced." Sometimes concepts are just better in theory and need to be tested out first. The "F" was placed significantly lower, and it was not recoverable. Which brings me to my My Recycling, Rule #2: Cover up. So, now you can guess why there is a sentiment matted onto Swiss Dotted Bazzill paper. Shhh - don't tell anyone, it'll be our secret, yes?
  • After (to my absolute relief) of kinda nailing my punny sentiment, I realized it stamped the sentiment crooked but cut out the card stock straight. Duh. Sigh. Groan. I was planning on aligning the matted sentiment parallel to the edge of the card, but it was so obviously crooked. So, if you tilt the sentiment in the direction it was crookedly stamped (in my case, i stamped it slanting upward and I tilted the whole matted sentiment upward), it's less noticeable. So you'll keep that secret, too, right?
Hope some of these hacks were helpful. Do you have other creative brad and eyelet uses? If so, bring 'em on before July 31st.  A guest design spot is at stake, and let me tell you I had a ball with these ladies. Thanks, Srap Our Stash, for a chance to play with ya'll and be a July Guest Designer.

Thursday, July 8, 2010

Feel Better Soon

My mom has a dear friend that just got out of surgery. Unfortunately they are not within driving distance and my mom, being the sweet person that she is, wanted to cheer her up. But Mom is in driving distance to her obsessive paper crafting daughter...surely, she has a stock-pile of hand-made "get well" cards, right? Or so one would think...

So, somewhere between this sketch in my head and my Mom's requirement of "fun & witty" to "make someone feel better," I brought out Elly, the Elephant, to play.
Elly was begging to be paper-pieced. Really. So, I had no choice.
Feel Better Soon Card
Stamps: Elly & Friends (Sweet 'n Sassy Stamps), Asian Garden (Waltzingmouse Stamps)
Paper: Basic Card Stock - Cream (Recollections), Card Stock Scrap Pack - Light Blue  (Recollections), Embellishment Paper - Cosmopolitan (Making Memories) 
Ink: Earth Elements - Chocolate Chip (SU!), Pigment Ink - Black (Colorbox)
Embellishments: Vintage Buttons - Brown (Papertrey Ink), Hemp Cord (Darice), Sewing Thread - Brown (Sewing Basket), Border Punch - Apron Lace (Fiskars), Spool 'o Ribbon - Brown (Michael's)

Unfortunately, by the time I finished Elly on my blue background, I realized I could not add another layer. So, Elly is at a slight angle. And a fun triple stripe of ribbon to anchor her down and I was pretty much done. Tried to make this as mail-friendly as possible.

Saturday, July 3, 2010

Dad - You're the Best

So it's finally safe to post this card :) With my brother's new job, my dad's travel schedule, and my travel schedule, my mom was ready to throw her hands up in the air when we were trying to plan a Father's Day outing. After much delay, we finally got together, two weeks later. I had this card created for my dad and did not wanted to post it here before he had a chance to see it. Evidently, my dad found my blog and has been commenting regularly in our conversations about my card-making abilities (e.g., "Why don't you open your own card store?") Isn't that just so sweet?

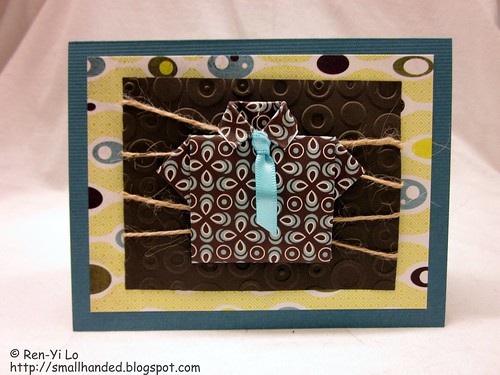
For this card, I knew that I wanted to try Erin's origami shirt tutorial from Schlosser Designs. If you have not checked out her site, hop on over. She has such great ideas for sewing and stamping that makes gifting or every-day. And she has great tutorials that she posts up every Tuesday. My next project will be a passport cover, since I travel so darn much. And Lilo (the Sewing Machine) needs to exercise more ;)

But I detract...without further ado I present a 100% Erin-inspired card:
Dad - You're the Best Card
Paper: Lucky Teal Cards & Envelopes (Creative Imaginations), Card Stock Scrap Pack - Brown  (Recollections), Offbeat (Basic Grey)
Ink: Earth Elements - Chocolate Chip (SU!)
Embellishments: Emboss A2 - Spots & Dots (Provo Craft), Jute Packaging Twine (Westim Crafts), Ribbon - Kingfisher (Paperchase)

Dad really loved it - especially the tie. Since I could not find an appropriate place to add the sentiment, I just stamped a sentiment "Dad - you're the best" in the card.

Are your family events also hard to plan? What is your secret to getting everyone together?

Thursday, July 1, 2010

Birthday Wishes

A guy co-worker was absolutely amused by my card crafting, when I mentioned how much engineering goes into designing and implementing a card - in fact it goes through the same stages of our beloved software engineering cycle. One has to think about the requirements for the card, then create a design that support the aforementioned requirements, and then execute the implementation, as well as test the card for robustness and quality.

Since his mother's birthday was around the corner, he then gave me an order to make a card. With nothing to go by (e.g., her favorite color, her preference for serious or whimsical), I had to use something to base my design on.

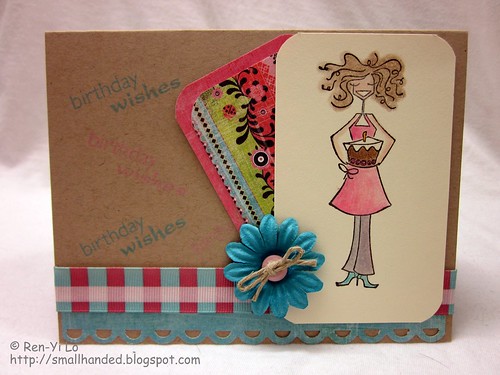
So I went with my trusty Stamping Bellas. Who doesn't like them?! And went to go find a sketch to get me-self some extra practice. Since I was ahead of the game and got my weekly Waltzingmouse Sketch done, I was skimming the vast world of sketches out there. It was suddenly when I remembered the sweet, sweet memory of my first stamp sets I ever owned. I bought them at my first introduction to paper crafting at a Stamping Around workshop, where I also met the talented, spunky and wonderful Korin Sutherland. I was immediately smitten by her. So I hopped over there and discovered the Sweet Stop Sketch blog. Why didn't I check this out earlier?! Silly me. And look what a fun sketch I found...

So without further ado, here is the birthday card for a co-worker's mom. I hope she likes it and that I didn't choose colors that she did not like.

Birthday Wishes Card
Stamps: cakebella (Stamping Bella), Asian Gardens (Waltzingmouse Stamps)
Paper: Paper Basics Card Stock - Kraft (Papertrey Ink), Basic Card Stock - Cream  (Recollections), Urban Prairie (Basic Grey), Oasis (sei)
Ink: Perfect Match Pigment Ink - Hawaiian Shore (Papertrey Ink), Brilliance - Pearlescent Coral (Tsukineko), Pigment Ink - Black (Colorbox)
Embellishments: Corner Punch (EK Success), Border Punch - Apron Lace (Fiskars), Vintage Button Collection - Spring Mix (Papertrey Ink), Frosting Flowers Floraux de Fleur (Prima Flowers), Hemp Cord (Darice), Ribbon - Turquoise/Magenta Plaid (Michael's), Softcore Colored Pencils - PC929 Rose, PC946 Dark Brown, PC1002 Yellowed Orange, PC939 Peach, PC1052 Warm Grey 30%, PC905 Aquamarine (Prismacolor), Odorless Mineral Spirits (Gamsol)

I colored my cakebella to match the rest of the card's color theme. This card was also created with the recent PTI package that had arrived. Working with amazingly thick card stock makes such a big difference. My card stands -- all on its own -- just thoroughly amused by this little fact :)

So on a more amused note, this card will be traveling internationally. I hope the recipient is delighted by it.

Wednesday, June 30, 2010

It's a Girl!

I had so much fun playing in my first Embellish challenge, I could not resist to try for this next one! Not to mention, the talented Ashley Cannon Newell always is on the lookout on what's currently hot & trendy. Here are the deets for the challenge:


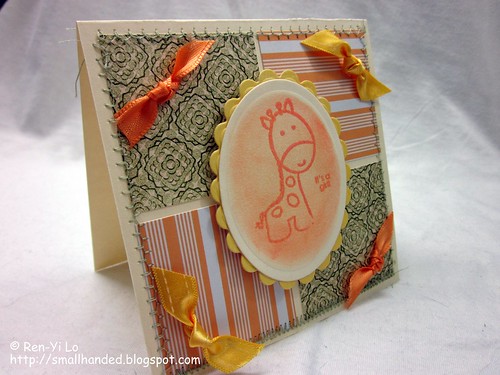
This card came pretty quickly together, since I had a good idea what my layout was going to look like, as inspired by the Waltzingmouse Sketch Challenge #4.

Here is the card, not created on the last minute deadline rush on a Thursday night -- aren't you proud of my non-procrastination?
It's A Girl Card
Stamps: Snag 'em Stamps - Giraffe (imaginisce), Wonderfully Whimsical (Papertrey Ink)
Paper: Basic Card Stock - Cream  (Recollections), Boxer (Basic Grey), Urban Prairie (Basic Grey), Oasis (sei)
Ink: Brilliance - Pearlescent Orange (Tsukineko)
Embellishments: Nestabilities - Cassic Small Ovals (Spellbinders), Nestabilities - Classic Scallop Ovals Small (Spellbinders), Vintage Button Collection - Spring Mix (Papertrey Ink), Taylor's Tiny Twinkles - Multicolors (Taylored Expressions), Hemp Cord (Darice), Ribbon - Coral (Michael's), General Purpose Thread - Pewter (Coats & Clark)

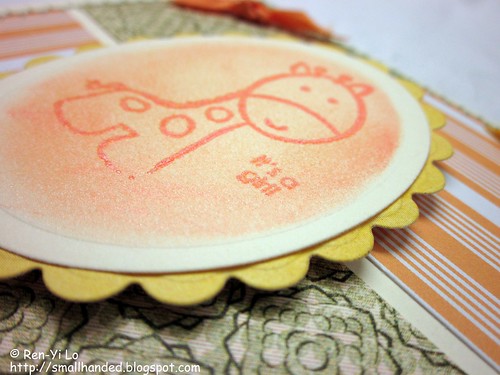
So this marks my first baby card. The four bows is a lose interpretation of the circle in the sketch. I used one of Claire's tips to ink up the card stock with the nestability frame still on. There is also clear embossing on the giraffe to add a little definition to the image.
It's A Girl Card
Baby cards might be my new favorite kind of card to make. They are so adorable. What are yours?

Sunday, June 27, 2010

Lilo's First Adventure

When reading all the talented craft blogs, I could not help but think that I should get up the courage to learn how to sew. I never had a home economics class in school, nor did I grow up with sewing around the house -- unless you count sewing on a button. And that does not even count, since they do not tend to stay on long!

So my first mission was to do research! I asked a few friends, who asked other friends for me, and before you know it, I had expert sewing advice coming about. In addition I remembered Becky having a few awesome sewing post where she shared about her new purchase. So shout outs go to Inés, Becky, Talida and Nat for helping me with my purchasing decision.

When deciding on a machine I had to ask myself a few questions, and along I realized there were two main points I learned were most important to me: 

  • I do not know how to sew - I might hate it or I might be terrible at it. I should put a small investment down to see if I like it. So purchasing an expensive machine was out of the question. If I loved sewing, then it would be natural growth progression to upgrade to a better one. A Bernina perhaps ;)
  • I wanted enough sewing functionality to experience the whole spectrum in sewing. My stretch goal is to create a quilt one day. In the meantime, the sewing machine had to serve as an embellisher for cards and clothes, or a fixer-upper for hemming pants (for short people) or fixing a trim on a shirt.
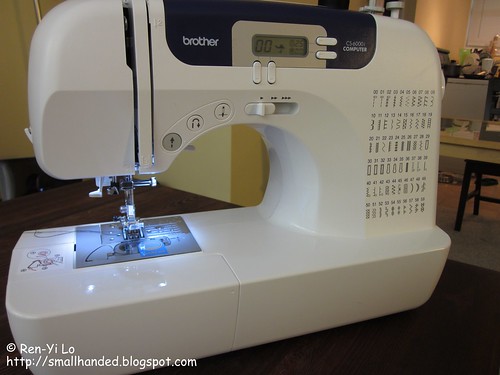
Without further suspense, I decided on a Brother CS6000i, which I baptized Lilo. As in Lilo & Stitch. Get it? ;)

Lilo - the Sewing Machine

Inés was kind enough to show me the basics, and I went crazy trying to try every stitch setting. I basically sewed over every inch of my 5x4" scrap that Inés gave me. After about 10 minutes of playing around, I felt super confident that Lilo and I could make something.

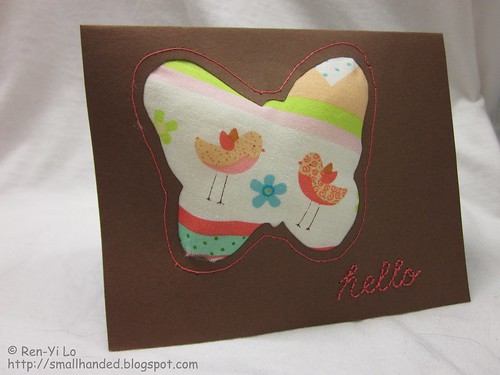
Incidentally, Scrap Our Stash was having a June Stitch Challenge. Perfect opportunity to get down & dirty with the basics of sewing. So off I went to design a card based around stitching. Other sewing projects were also on my mind and I was picking up fabric, when I decided that I would cut a little corner off and use it in my card. I thought of creating an easy shaped template to cut out the space, fill the negative space with fabric, backing, and poly-fill to create a cushiony, three-dimensional card, and add a hand-written sentiment on the bottom to give it more of that "stitched with love" feeling. 


Hello
Paper: Card stock - Close to Cocoa (SU!)
getments: Fabric (Joann's); General Purpose Thread - Coral (Coats & Clark)

Here is what I learned:
  • Do not use organic shapes as your first sewing assignment. Stick with straight lines. And practice navigating around.
  • Read the sewing machine's manual. There is a tension knob to help adjust threading so that the bottom thread does not poke through the top. And practice various tension settings on card stock.
  • Choosing the stitch length directly effects how easily one can navigate the curves. Practice in this would have also helped.
  • Pre-piercing the sentiment with a pushpin or needle makes it easier to hand-stitch the sentiment.
  • Use heavier card stock.
I am a little disappointed in some of the off-track stitching and boo-boos that happened, but as a first-attempt or proof of concept I think I managed to achieve what I wanted to. I will definitely try this kind of card again after I have become more comfortable sewing and getting to know the ins and outs of my sewing machine. Let's see if I can't give it a cleaner look then...In the meantime wish me luck on my pajama pants. Here is hoping that both pant legs come out the same length! What was your first sewing project? Any pointers?
Related Posts with Thumbnails