
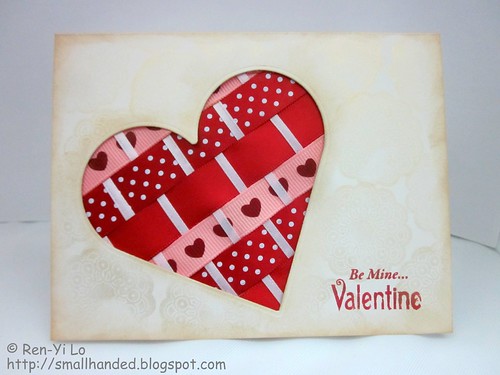
In the meantime, this week at DYSU we are encouraging you to use your Ribbon stash. I'm one of those guilty ones that loves buying it and then I forget to use them in cards. So I went all out and picked out the pretty reds and pinks to use on a Valentine's card. I hope it tickles!

Stamps: (Dainty Doilies, Seasons of Love - Tags) Waltzingmouse Stamps
Paper: (Paper Basics Card Stock - Vintage Creme) Papertrey Ink
Ink: (Tim Holtz Distress Ink - Antique Linen) Ranger; (Versamark) Tsukineko
Embellishments: (Nestabilities - Classic Hearts) Spellbinders; (Perfect Pearls - Perfect Gold) Ranger; (Ribbon 'O Spool - Red) Offray; (Basic Basic - Red) Celebrate It; (Trim - Pink with Hearts) Recollections; (5/8" Swiss Dot Satin Ribbon - Pure Poppy) Papertrey Ink
This took me a couple of tries to figure the ribbon weaving out, because I'm a neat freak. I need everything to be nicely glued down and aligned. My first step was to pick out ribbon with fun textures and designs; then test them next to each other to see how it looks. Then I cut out the window on my card with the heart; traced the heart onto a scrap card stock that would become the backing to my window. The good thing about tracing the heart is that every inch of that part should be covered with ribbon. I started cutting strips to size and glueing one end of the ribbon down.
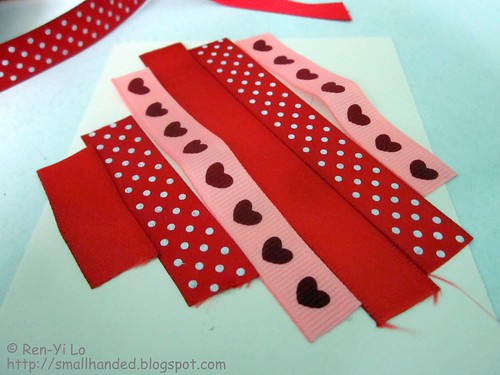
Then I played around with different kinds of ribbon to weave. I didn't like the look of weaving the 5/8" ribbon in, so I pulled out some 1/8" pink ribbon. I like how it segments the ribbon into many different parts, so I stuck with this look. With care, I wove in the ribbon and made sure to glue down each top and bottom of my 1/8" ribbon as I went. Weaving is significantly easier if you only glue down one side of the ribbon, allowing me to lift the bigger ribbons and scoot the 1/8" band into position. Surprisingly, it still looks like an ugly duckling, but once the heart window is positioned over it, no one has to know ;)

Here is what it looks like after you cover it up and and glue the window into place. Nifty, right?

If I had enough foresight I would have added the distress ink and the perfect pearls before glueing the top part on. But I often find myself "done" and then wondering what else is missing and whipping out another round of supplies...Anyone else craft like that?
After a round of watermarked doilies and perfect pearls to dust on and another round of careful sponging around the edges with Antique Linen, I call it done.

What nifty ideas do you have for your ribbon? If you need more inspiration make sure to check out the DTs samples.
Our sponsors this week:
Winner's Choice of 4 images  | Winner's Choice of 5 images  | Winner's Choice of 4 images  | 10£ Gift Voucher  |
13 comments:
This is gorgeous Ren-Yi! Awesome idea to use some of my ribbon scraps :)
Hugs Lisa
This is FREAKIN' AWESOME! LOVE the ribbon weaving...as well as the cut-out heart and faint background stamping!
I haven't bought any Waltzing Mouse stamps yet because I couldn't decide which set to take out of my basket to make my order LESS than USD $300+...LOL! I ADORE their designs and I'm sure once I do take the plunge, they'll be right up at the top of my favourites list with Flourishes and The Greeting Farm! Can't wait but, since I'm going to CHA, I have to restrain myself, haha...we can't have it ALL, now, can we?
Naomi
xoxo
This is totally gorgeous. Great ribbon weaving and beautiful delicate background stamping. I love this card.
Hugs
Denise xx
This is STUNNING, Ren-Yi! I love it. Thanks for taking pics before you framed it.
This is just awesome! Such a great idea to weave the ribbon!
Hugs,
Wenche
This is so pretty Ren Yi, absolutely gorgeous!
Well-done!
Truly beautiful card, and I like your idea to use ribbon-it's amazing!
Brilliant card Ren-Yi & a fantastic way to use up scraps of ribbon!!
Pam x
This is amazing, Ren-Yi! I love the weaving you did and the subtle doily background is super! Great job!!
Fabulous! Such a great idea and you chose an amazing mix of ribbons to weave. Love it!
WONDERFUL!! Love the whole look of the woven ribbon. Good to see the process in pics!
That's so different - love it
WOW Ren-YI!!!!!!!! This is wonderful!! Thanks for the mini tutorial, this is something I am going to have to try.
I don't have any Waltzingmouse stamp. I am afraid that if I strat then it will be another company for which I will NEEED to have all the stamps LOL!
Post a Comment