Good morning everyone! The weekend is almost over on the US East Coast. Sighs... back to the grind tomorrow. I have lots lined up, so I have no time to kill!
I haven't had a chance to work through my Italian project yet, but my plan was making Pesto from scratch and enjoying it with some tomato & mozzarella salad. It has all the colors of Italy right there, and has the some of the best simple flavors that can work magic. Fresh, bright, and rich...
Too bad work has been super busy so I haven't had a chance to harvest my Basil.
So from now on, the schedule is such for our QuAC...
1st of every month - a new question goes up at 12:01 am
7th of every month - the answer part gets re-capped and the creation starts. You have one month to make a project with the results of the readers as your inspiration
A small giveaway to one random player is up for grabs for September's QuAC #1. Something Italian and something delicious...You have 8 more days to enter :) I hope you will consider joining me.
Talk soon!
Sunday, September 30, 2012
Glitter Cards Tutorial - Part I
2012.09.30 - Edited to answer Elisa's Questions
"Would it work if you removed every second strip, glitter, and remove the remaining ones and glitter them?"
In Step 3, I actually work from top left to bottom right, one strip at a time, because when I shake the excess glitter, I tap it so that the excess glitter falls from top left to bottom right (never over an area where the glitter has been applied already). Sometimes the glitter gets "stuck" onto the back of the tape, or I brush it so that it does not touch a glittered section; I think your technique could work. In theory it makes sense, but I am rather conservative and a perfectionist, so I wanted to work through it methodically. Maybe you can start with the darker glitter so that when you tap the excess off the lighter color, it doesn't run into your lighter color. If I try it, I'll report back with images.
Hello there! I am so glad it's the weekend. It's still quite brutal at work and I have trying to catch up on some much needed sleep and rest. But I should also take the time to catch up on a few things crafty related.
I mentioned I would post you a tutorial for some glitter cards that were showcased as part of the of Scrapbook Steals Blog Hop. We'll let's get started!
Remember this Xmas Card?
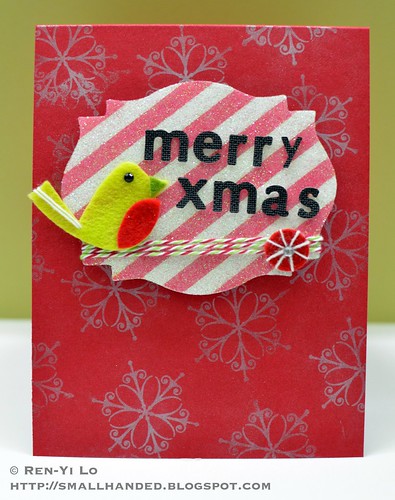
Stamps: (Seasons of Love) Waltzingmouse Stamps
Paper: (Paper Basics Card Stock - Pure Poppy) Papertrey Ink; (Card stock) scrap bin
Ink: (Versamark) Tsukineko
Embellishments: (Double Sided Ultra Sticky Clear Tape - 3.5mm) Stix2; (Perfect Pearls - Perfect Pearl) Ranger; (Iridescent Glitter - Cherry Popsicle, Sugar Cube) Martha Stewart; (Christmas Twine) The Twinery; (Alphabet Stickers) Prima; (Kris Kringle - Felt elements) SEI; (Nestabilities - Labels Eighteen) Spellbinders
The tutorial will only focus on making the glitter panel focal point, but I will write a little summary on the bottom how to make this card.
To make the glitter tag
"Would it work if you removed every second strip, glitter, and remove the remaining ones and glitter them?"
In Step 3, I actually work from top left to bottom right, one strip at a time, because when I shake the excess glitter, I tap it so that the excess glitter falls from top left to bottom right (never over an area where the glitter has been applied already). Sometimes the glitter gets "stuck" onto the back of the tape, or I brush it so that it does not touch a glittered section; I think your technique could work. In theory it makes sense, but I am rather conservative and a perfectionist, so I wanted to work through it methodically. Maybe you can start with the darker glitter so that when you tap the excess off the lighter color, it doesn't run into your lighter color. If I try it, I'll report back with images.
Hello there! I am so glad it's the weekend. It's still quite brutal at work and I have trying to catch up on some much needed sleep and rest. But I should also take the time to catch up on a few things crafty related.
I mentioned I would post you a tutorial for some glitter cards that were showcased as part of the of Scrapbook Steals Blog Hop. We'll let's get started!
Remember this Xmas Card?

Stamps: (Seasons of Love) Waltzingmouse Stamps
Paper: (Paper Basics Card Stock - Pure Poppy) Papertrey Ink; (Card stock) scrap bin
Ink: (Versamark) Tsukineko
Embellishments: (Double Sided Ultra Sticky Clear Tape - 3.5mm) Stix2; (Perfect Pearls - Perfect Pearl) Ranger; (Iridescent Glitter - Cherry Popsicle, Sugar Cube) Martha Stewart; (Christmas Twine) The Twinery; (Alphabet Stickers) Prima; (Kris Kringle - Felt elements) SEI; (Nestabilities - Labels Eighteen) Spellbinders
The tutorial will only focus on making the glitter panel focal point, but I will write a little summary on the bottom how to make this card.
To make the glitter tag
- First die-cut a scrap piece of card stock into Label Eighteen.
- Adhere double-sided tape onto the label.
Tip: Scor-tape also works well here, but I had some Stix2 lying around, which is the same.
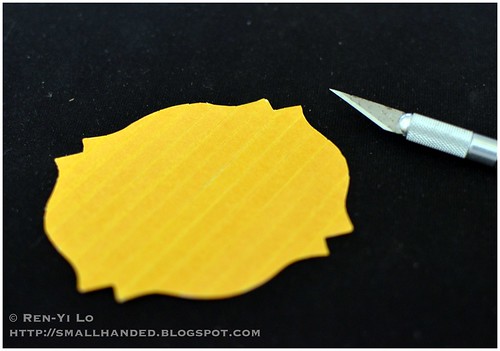
Tip: I start at the center and estimate which diagonal would be longest and adhere that one first. Then I work from the center out. This way I can insure that your diagonal is perfect. I have difficulties starting from the top left corner, because the angle to cover is quite small and if the diagonal is angled wrong, the error won't perpetuate onto the entire label. Does this make sense? If not, let me know in the comments and I will demonstrate in another picture...
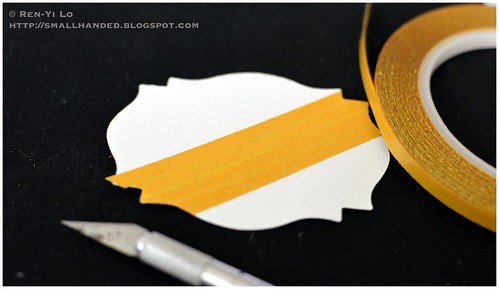
The finished label should look like this:
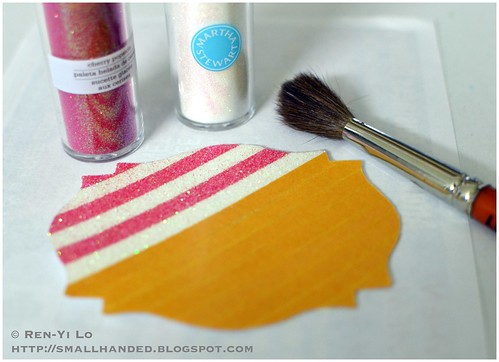
- Peel one strip off and apply glitter, alternating colors to each strips.
Tip: After peeling one strip back, I apply the glitter, tap the excess off, and then brush the excess off. Then rinse & repeat with the second color. To minimize the glitter mess, I just work methodically, slowly, and always dump the excess back into its tube.
- Cut card stock in portrait view to 4.25"; score at 5.5" for vertical fold card
- Stamp card stock with Snowflake stamps in Versamark
- Dust snowflakes with Perfect Pearls - Perfect Pearl color
- Create glitter tag (see tutorial)
- Wrap Christmas twine three times around Label Eighteen Tag; adhere twine in back with adhesive
- Add alphas to tag
- Add felt elements to tag
- Adhere tag to base card stock
Labels:
birthday,
cards,
christmas,
martha stewart,
tutorial
Thursday, September 27, 2012
[Paperplay Challenges] Week No. 39 - Lace & Flowers
Note: If you are looking for DYSU Challenge - please keep scrolling :)
Hi there! How are you doing? We're here to introduce another Paperplay Challenge. Something sweet & easy: Lace & Flowers. I decided to dig into my My Mind's Eye stash...
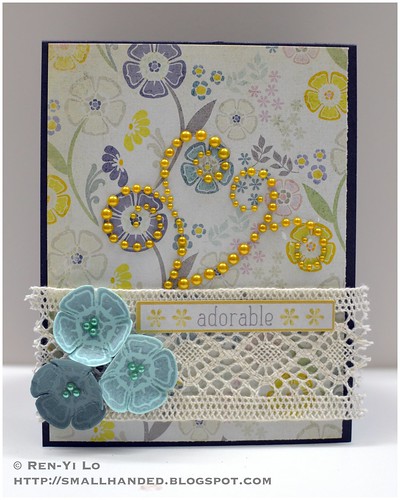
Stamps: (Miss Caroline "Fiddlesticks" Collection - "Story" Stamps) My Mind's Eye
Paper: (Paper Basics Card Stock - Smokey Shadow, Aqua Mist, Ocean Tides) Papertrey Ink; (Miss Caroline "Fiddlesticks" Collection) My Mind's Eye
Ink: (Memento - London Fog) Tsukineko
Embellishments: (Miss Caroline "Fiddlesticks" Collection - "Home" Pearl Swirls, "Story" Stickers Labels) My Mind's Eye; (Cottom Lace Trim 45mm) Waltzingmouse Stamps
The flowers are stamped from the My Mind's Eye set and cut them out. The lace is acquired from a Waltzingmouse Stamps purchase a while back - it's gorgeous, luxurious lace - one that I love looking at and feeling. It makes me happy :)
The swirls make a nice cute little focal point and the stickers help give the card a quick sentiment without having to ink up anything else.

That's all I have for you now. Go see what the other PPC girls did on this challenge. They will absolutely knock your socks off...! Hope you will be playing along with us this week...!
And if you're a regular reader on this blog, don't forget to answer my quick little survey on the top right or enter into this month's QuAC #1 inspiration!
Our sponsor this week:
Hi there! How are you doing? We're here to introduce another Paperplay Challenge. Something sweet & easy: Lace & Flowers. I decided to dig into my My Mind's Eye stash...

Stamps: (Miss Caroline "Fiddlesticks" Collection - "Story" Stamps) My Mind's Eye
Paper: (Paper Basics Card Stock - Smokey Shadow, Aqua Mist, Ocean Tides) Papertrey Ink; (Miss Caroline "Fiddlesticks" Collection) My Mind's Eye
Ink: (Memento - London Fog) Tsukineko
Embellishments: (Miss Caroline "Fiddlesticks" Collection - "Home" Pearl Swirls, "Story" Stickers Labels) My Mind's Eye; (Cottom Lace Trim 45mm) Waltzingmouse Stamps
The flowers are stamped from the My Mind's Eye set and cut them out. The lace is acquired from a Waltzingmouse Stamps purchase a while back - it's gorgeous, luxurious lace - one that I love looking at and feeling. It makes me happy :)
The swirls make a nice cute little focal point and the stickers help give the card a quick sentiment without having to ink up anything else.

That's all I have for you now. Go see what the other PPC girls did on this challenge. They will absolutely knock your socks off...! Hope you will be playing along with us this week...!
And if you're a regular reader on this blog, don't forget to answer my quick little survey on the top right or enter into this month's QuAC #1 inspiration!
Our sponsor this week:
[DYSU] Challenge #91 - Scallops
Good morning, DYSU fans! I'm a little short on time, so no long drawn out updates ;) This week we are challenging you with a classic: Scallop. So let's get started?

Stamps: (Fruit Barrow) Crafty Sentiments; (Big Bloom - Chrysanthemums) Waltzingmouse Stamps
Paper: (Paper Basics Card Stock - Fresh Linen) Papertrey Ink; (Miss Caroline "Dolled Up") My Mind's Eye; (orange) scraps
Ink: (Jenni Bowlin - No. 11 Brown Sugar) Ranger; (Versamark) Tsukineko
Embellishments: (Soft-core Color Pencils) Prismacolor; (Nestabilities - Classic Scalloped Circles Small) Spellbinders; (Impression Plate - Woodgrain; Jute Button Twine; Vintage Button Collection - Brown) Papertrey Ink; (A2 Embossing Cuttlebug Folder - Swiss Dots) Provocraft; (Border Punch - Scalloped Sentiment) Fiskars; (Perfect Pearls - Perfect Copper) Ranger; (Gelly Roll - Metallic Collection) Sakura
I embossed the main panel with swiss dots. The panel is stamped with Versamark and then dusted with Perfect Pearls Copper as well as trimmed with a border punch with scalloped sentiment shape. The main scalloped circle is impressed with woodgrain plate for added texture. The fruit barrow is colored with Prismacolor color pencils and paper pieced with some My Mind's Eye.

The sentiment is from Waltzingmouse Stamps and the rest of the embellishments are from Papertrey Ink. Quick way to anchor a sentiment.
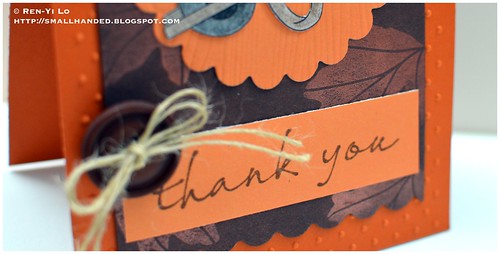
That's all I have for you! Hop on over to see the amazing creations by the rest of the DYSU team. Please leave them a loving comment, because they do appreciate some blog love :)
On a last note, if you're a regular reader, don't forget to answer the survey in the top right panel and if you want to play along with in the current open QuAC challenge feel free to. Just a few more days left...
This week's sponsor:
* Winner's Choice of 4 Images
*$15 Gift Certificate for Digis
* $15 Gift Certificate on Cutting Files or Digis
Labels:
challenge,
crafty sentiments,
dysu,
thank you,
thanksgiving,
waltzingmouse stamps
Tuesday, September 25, 2012
Hi
Hello there! Last week and this week have been relatively stressful. Been getting home at 9p and starting my days quite early. So sorry for the quick posts - I also know that I owe you a bunch of tutorials, which are on my to-do list. However, when coming home so late, all I want to do is feed by grumpy stomach, take an Aleve for my pressing headache, and get to sleep. Never mind time to craft or to squeeze in much blogging time. But I promise to be and I will be posting up a vengeance ;)
I made this quick card for the latest CR84FN challenge. Number 63, so a indicator that this challenge blog is well past it's one-year birthday. How did I miss this? Sorry, Mona & the team...! I do love the quote this week...it especially applies to how I feel at work. People are always uncomfortable with new ideas, new processes, new anything...because change means uncertainty. But how else can we drive innovation & technology if we don't embrace the new or push the envelope? It's just food for thought and I'd love to hear your responses...
Well here is something new I'm trying...I've made a few cards without stamping and they turned out quite fun. But the new thing here is to make the background paper the foreground...What do you think?

Stamps: N/A
Paper: (Paper Basics Card Stock - Fresh Linen) Papertrey Ink; (Woodland Park Collection) October Afternoon
Ink: N/A
Embellishments: (Woodland Park Collection - Chip 'n Stick, Designer Brads, Decals - Alpha Stickers) October Afternoon; (Inkssentials - Glossy Accents) Ranger; (Brown Twine) Waltzingmouse Stamps; (1 1/4" Circle Punch) Marvy Uchida; (1" Circle Punch) Ek Success; (Tag from a car service) Recycled
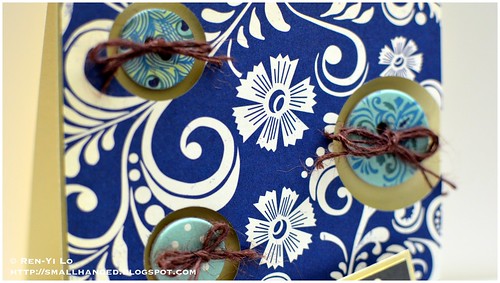
Usually I like to cut out my pattern paper and adhere it nicely to the base card stock - the nice & conservative way. But I have seen so many others play with negative space so much and the idea of flipping it around really appealed. If the color challenge demands Denim, Tan & Brown, mind as well bring out one of those colors as a main focal point, right? Here's a nice up close picture of the blue, and the use of negative space filled with blue chipboard buttons threaded with brown twine.
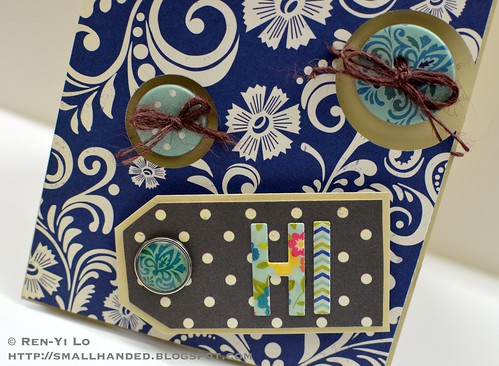
Tried to finish this with a sentiment on a tag. The brown tag is actually a tag saved from a previous car maintenance which I have covered in pattern paper. It seemed nice & durable and it had a blank side (although quite ugly, because it was a saturated yellow color), which is why I had saved it. The rest is a fun brad and alpha stickers, which I glossed up. It doesn't quite show up well in the picture.
Well that's all I have for you. If you want to play along, you better hurry. Not many more hours left... I'm just sneaking in here to write up a quick post...But don't fear, another CR84FN will be up and running in no time....!
Thursday, September 20, 2012
[DYSU] Challenge #89 - Use a Flag or Tab
Good morning, DYSU fans! Are you ready for another challenge? I'm still swamped at work and have not had much time to really get going on anything else. I hope you're enjoying the start of fall...I see the leaves falling already, when I commute to work and I'm looking forward to getting my first Pumpkin Spice Latte.
This week we have a fun little challenge: Use a Flag or Tab. It's a fun trend popping up everywhere...

Stamps: (Party Penguin) Meljen's Designs
Paper: (Paper Basics Card Stock - Fresh Linen) Papertrey Ink; (Basic Card Stock - White) Recollections; (Lost & Found - Breeze) My Mind's Eye
Ink: (Tim Holtz Distress Inks - Antique Linen) Ranger
Embellishments: (5/8" Saddle Stitch Ribbon - Hawaiian Shore, Aqua Mist) Papertrey Ink; (Lost & Found - Breeze); (Soft-core Color Pencils) Prismacolor; (Essential Glitters - Turqoise) Martha Stewart; (Stickles - Gold) Ranger
I had this beautiful paper from My Mind's Eye sitting around and I picked my color scheme from there. I thought a brown/tan penguin would be a fun little non-tradtional color, and went from there. The ribbons are some scrap that I had lying around, which I converted into tabs. And of course Party Penguin is carrying his own "Hooray" flag. Here an up-close picture of this happy little guy...
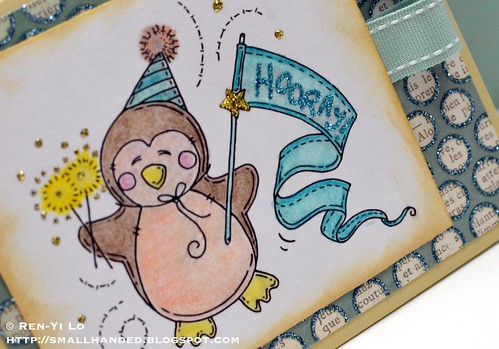
That's all I have for you! Hop on over to see the amazing creations by the rest of the DYSU team. Please leave them a loving comment, because they do appreciate some blog love :)
On a last note, if you're a regular reader, don't forget to answer the survey in the top right panel and if you want to play along with in the current open QuAC challenge feel free to :)
This week's sponsor:
* Winner's Choice of 4 Images
* Winner's Choice of 3 Digis
* Winner's Choice of 3 Digis
Labels:
cards,
challenge,
dysu,
meljen's designs,
winter holiday
Friday, September 14, 2012
[Scrapbook Steals] September Blog Hop - Glitter
Good morning, lovelies! It's Friday. And I'm breathing a sigh of relief. Can you hear it? Today I have a special post up for you. If you know me, you know I can't resist great crafty products. And if you know me even better, you know I can't resist a good sale. So what happens if you combine both of these loves? An addiction named Scrapbook Steals. This site have many a lovely products, including the whole line-ups of My Mind's Eye, Crate Paper, Studio Calico, October Afternoon...basically products that I love to use on projects, so this site really wins it for me.
When Scrapbook Steals was asking for guest designers, I thought "why not?!" Miraculously I got picked. So a big thank-you for letting me guest design with the Scrapbook Steals group.
Today we're showcasing some yummy Martha Stewart glitters. Now, what girl doesn't like a little bit of bling or sparkle, right? We have a great line up of very talented girls bringing you some inspirations on how to stretch that glitter. If you followed along the blog hop, you should be arriving from sweet Julie's blog. If not, you might want to start from the beginning.
I have a few creations for you today, and I promise to post up a follow-up tutorial. I received three colors of Martha Stewart Iridescent glitter: cherry popsicle, ice cube, and sour apple - it screams Christmas, doesn't it?
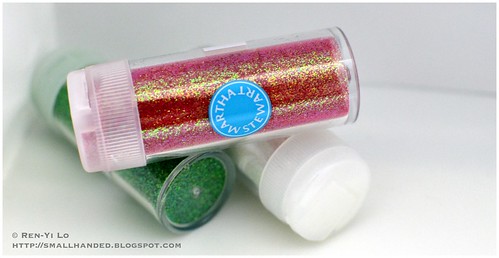
So the one thing that sometimes makes me not a fan of glitter is that it gets everywhere. And when I mean everywhere, I mean everywhere...I think some of it came with me to work, some of it may even be stuck in between my keyboard keys. Sometimes I'm convinced I see a fleck of it in my hair or still attached to parts of me...but it might be the glitter paranoia speaking. So when I work with "messier" products, I like to be in as much control as possible. What does this mean? Contain it, tape it down... please just don't come off ;)
One of my favorite techniques is to combine glitter with scor tape. I will post up a step-by-step tutorial soon to show how you can get the glitter on and save yourself the mess...

Stamps: N/A
Paper: (Paper Basics Card Stock - Pure Poppy) Papertrey Ink; (Card stock) scrap bin
Ink: (Versamark) Tsukineko
Embellishments: (Double Sided Ultra Sticky Clear Tape - 3.5mm) Stix2; (Perfect Pearls - Perfect Pearl) Ranger; (Iridescent Glitter - Cherry Popsicle, Sugar Cube) Martha Stewart; (Christmas Twine) The Twinery; (Alphabet Stickers) Prima; (Kris Kringle - Felt elements) SEI; (Nestabilities - Labels Eighteen) Spellbinders
I knew I wanted to make a peppermint striped color scheme and couldn't resist this little felt bird I had in my stash. A little alphas here, a bit of snowflake stamping & dusting with Perfect Pearls, and I pronounce this my first Christmas card of the year...The twine was actually a cool find by my DYSU buddy Jan, which we split three ways. A great frugal way to share some products, right? And twine is also so light to ship...
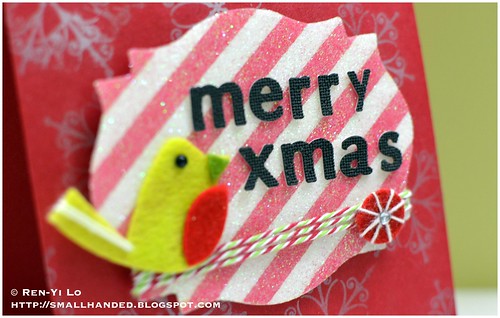
Look how clean the glitter lines up with the scor tape? I'm just tickled how this came out...more tips & tricks on another post, I promise!
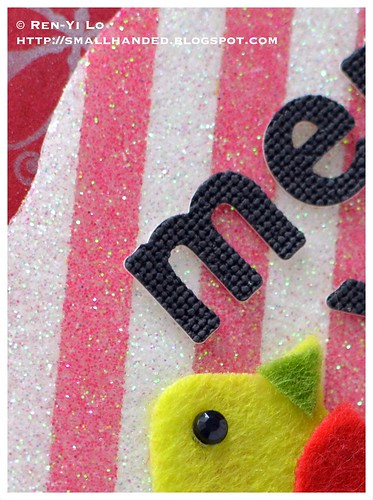
My second card of today is a fun birthday card, using more glitter! And it's a fun little interactive card, because you can "shake it, shake it....like a polaroid picture." (If you can name the song and the artist...leave 'em in the comments ;)
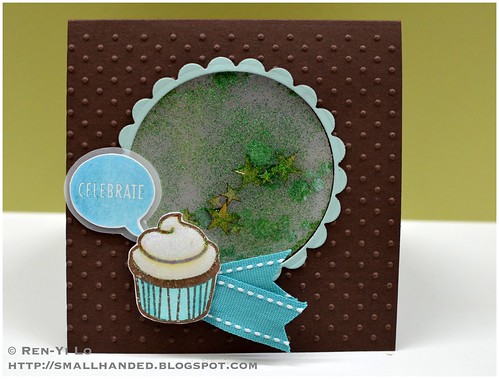
Stamps: (Celebrate Special Edition) Studio Calico & Hero Arts
Paper: (Paper Basics Card Stock - Dark Chocolate, White, Aqua Mist; Stamper's Select Vellum) Papertrey Ink; (Acetate)
Ink: (Jenni Bowlin - No. 11 Brown Sugar) Ranger; (Perfect Match Pigment Ink - Hawaiian Shore) Papertrey Ink
Embellishments: (Iridescent Glitter - Sour Apple, Sugar Cube) Martha Stewart; (Saddle Stich Ribbon - Hawaiian Shore) Papertrey Ink; (Wood Veneers - Stars) Studio Calico; (Nestabilities - Standard Circles Small; Classic Scalloped Circles Small) Spellbinders; (Inkssentials - Glossy Accents) Ranger; (Cuttlebug A2 Embossing Folder - Swiss Dots) Provocraft; (Soft-core Color Pencils) Prismacolor
I can post up more detailed shots about how I put this little shaker card together if you're interested, but it's pretty straight forward. I created a pocket by cutting out two circles (larger than the window) in both acetate and vellum. After lining them up back to back, I sewed around the edge and left a little opening. Since I have always loved the color combination of aqua and a nice crisp granny-smith green, I filled the little pocket up with some glitter (of course), a few little wood stars and aqua confetti to make it a party inside the pocket.
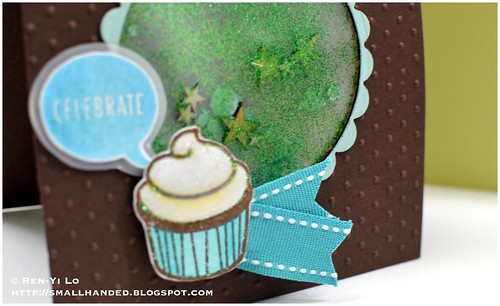
The cupcake is stamped, colored with color pencils, and then finally iced with a layer of Sugar Cube glitter, followed by a nice generous layer of Glossy Accents. It gives the top layer of the cupcake a little more dimension by making it into an home-made (inexpensive) epoxy. A little bit of ribbon (that I stapled together), a fun little sentiment backed with vellum, and voila. Easy peasy card that you can make...and the best part? The glitter is contained ;)
Thanks for letting me share these two projects with you. I hope you enjoyed them.
Now off you go to the ever so talented Lisa. Just a small reminder that prizes are to be had. Leave a comment by Sunday September 16 11:59pm MST, and a lucky random winner from one of the eight blogs will be drawn to receive a $20 gift certificate. How awesome is that?
Here the blog hop details in case you get lost:
- (Scrapbook Steaks)
- (Erica Bass)
- (Julie Ann Cordero)
- Ren-Yi Lo <---------- you are here
- Lisa Bankes-Lahiff
- Neela Nalam
- Amy Brock Coose
- Becki Adams
Labels:
blog hop,
cards,
guest designer,
martha stewart,
scrapbook steals,
sei
Thursday, September 13, 2012
[Paperplay Challenge] Week No. 37 - Fancy Folds
Note: If you are looking for DYSU Challenge - please keep scrolling :)
Hi there! It's Week 37. Yikes. Are you planning christmas or winter cards yet? I'm not ready, because I haven't even warmed up to Halloween card! Why does the year just go so fast?!
If you need something to get you started, we have a fantastic and challenging challenge: Fancy Folds. This one scared the wits out of me, because I like my whole A5 cards. Why? It uses every bit of my card stock, and there is no waste. And that's how I like to roll...So here is what I came up with...

Stamps: N/A
Paper: (Paper Basics Card Stock - Orange Zest) Papertrey Ink; (Gathering) Authentique
Ink: N/A
Embellishments: (3/8" Topnotch Twill - Dark Chocolate; Saddle Stitch - Hawaiian Shore) Papertrey Ink; (Gathering Collection: Two-sided Elements - Tabloid, Icons, Excerpts) Authentique
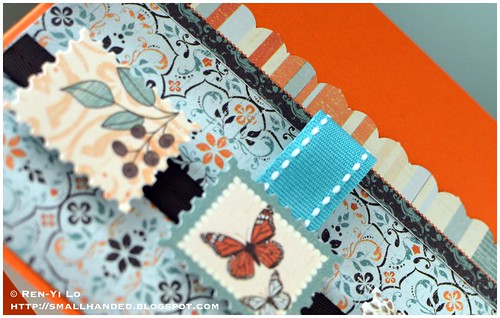
If you are wondering where the fancy fold is... you're right. It's not. But here is a nice up-close shot of the card. I love these beautiful postage embellishments...aren't they beautiful? And since I had a scrap ribbon laying around, I decided to use it up now... (or never). Ever save scraps and you forget to use them?
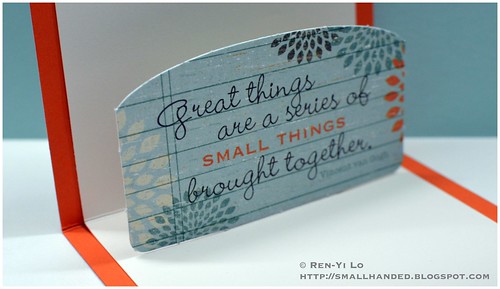
Ok, so I was kidding about not making a fancy fold card. I mean - I don't want to get fired from the team ;) So where is the fancy fold? In the inside of course...Peek-a-boo. It's a pop-up...!
Hope you like it! Hop on over to see how the rest of the PPC girls did on this challenge. They will absolutely knock your socks off...! And if you're a regular reader on this blog, don't forget to answer my quick little survey on the top right! Hope you will be playing along with us this week...!
Our sponsor this week:
Hi there! It's Week 37. Yikes. Are you planning christmas or winter cards yet? I'm not ready, because I haven't even warmed up to Halloween card! Why does the year just go so fast?!
If you need something to get you started, we have a fantastic and challenging challenge: Fancy Folds. This one scared the wits out of me, because I like my whole A5 cards. Why? It uses every bit of my card stock, and there is no waste. And that's how I like to roll...So here is what I came up with...

Stamps: N/A
Paper: (Paper Basics Card Stock - Orange Zest) Papertrey Ink; (Gathering) Authentique
Ink: N/A
Embellishments: (3/8" Topnotch Twill - Dark Chocolate; Saddle Stitch - Hawaiian Shore) Papertrey Ink; (Gathering Collection: Two-sided Elements - Tabloid, Icons, Excerpts) Authentique
If you are wondering where the fancy fold is... you're right. It's not. But here is a nice up-close shot of the card. I love these beautiful postage embellishments...aren't they beautiful? And since I had a scrap ribbon laying around, I decided to use it up now... (or never). Ever save scraps and you forget to use them?

Ok, so I was kidding about not making a fancy fold card. I mean - I don't want to get fired from the team ;) So where is the fancy fold? In the inside of course...Peek-a-boo. It's a pop-up...!

Hope you like it! Hop on over to see how the rest of the PPC girls did on this challenge. They will absolutely knock your socks off...! And if you're a regular reader on this blog, don't forget to answer my quick little survey on the top right! Hope you will be playing along with us this week...!
Our sponsor this week:
[DYSU] Challenge #89 - Kraft & Twine
Good morning, DYSU fans! Are you ready for another challenge? This week snuck up on me so fast. At work we're all trying to complete our projects by the end of fiscal year (which is end of this month), so we're all ramping up (or down) depending how you look at it. So my posts are super short & sweet...
So, who loves kraft? If you answered yes, that you will want to enter this week's challenge: Kraft & Twine. Easy peasy - it's something that anyone needs to put a package together.

Stamps: (Little Heart Gingerbread) Meljen's Designs; (Offbeat Backgrounds, Candy Jar Christmas Fillers) Waltzingmouse Stamps
Paper: (Paper Basics Card Stock - Kraft) Papertrey Ink
Ink: (Perfect Pigment Match - Fresh Snow) Papertrey Ink
Embellishments: (Color Pencils) Prismacolor; (Liquid Pearl - Opal) Ranger; (Essential Glitter - Crystal Fine) Martha Stewart; (Indie Chic "Pictures" Tapes) My Mind's Eye; (Border Punch - Scalloped Sentiments) Fiskar; (Signo White Gel Pen) Uniball; (Pink Twine) gift from Danielle Walls
I love stamping white or embossing white on kraft. Absolutely love this combination! I started coloring this Gingerbread of a cutie pie from Meljen's Designs, outline the original black lines with white gel pen and white color pencils. I also used my liquid pearls to give him some beautiful icing decoration. The heart is actually a layer of liquid pearls and a nice generous dusting of glitter. It looks quite nice & shimmery in person, but I had a tough time capturing it on camera. Isn't he a happy little dude?
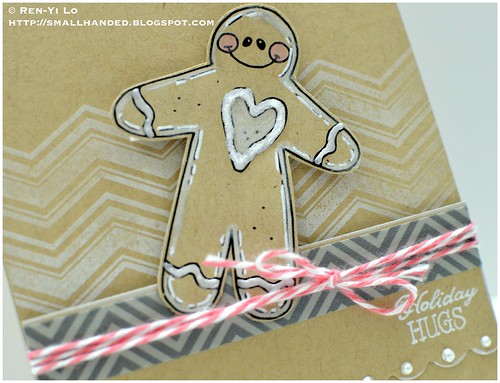
The rest is just a quick stamp of white chevron border on kraft to help anchor the gingerbread man, and a little bit of gray washi and cute pink twine (to match the cute gingerbread man's cheeks). I tried my hand at adding some pearls to the scalloped border. The white pigment ink was sponged around the border panel to give it some dimension and contrast from the main card stock.
That's all I have for you! Hop on over to see the amazing creations by the rest of the DYSU team. Please leave them a loving comment, because they do appreciate some blog love :)
On a last note, if you're a regular reader, don't forget to answer the survey in the top right panel. The second QuAC poll is up :)
This week's sponsor:
* $15 Store Credit
* Winner's Choice of 4 Images
* Winner's Choice of 3 Images
Wednesday, September 12, 2012
Hello
This is a quick post, because I wanted to enter this CR84FN challenge. If you haven't seen, Mona is having a DT call. When you see the team line up and if you know Mona, you'd jump at the occasion to join the team. It's absolutely a line up of wonderful girls, and Mona herself is one of the first online crafting people I have "met" through the Waltzingmouse Stamps DT team. She is always encouraging and sweet. So any chance to be working with Mona? Count me in...
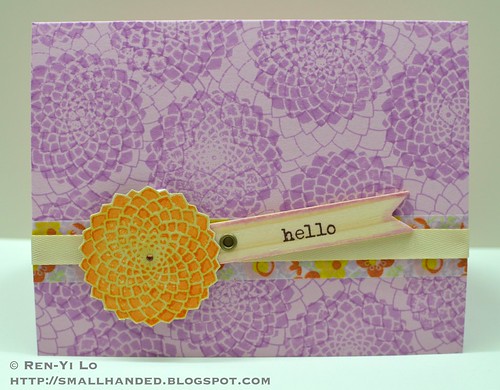
Stamps: (Big Blooms - Chrysanthemums) Waltzingmouse Stamps
Paper: (Paper Basics Card Stock - Fresh Linen, Lavender Moon) Papertrey Ink
Ink: (Versamark) Tsukinkeo; (Jenni Bowlin - No. 5 Chicken Feed Drops, No. 13 Lavender Sachet) Ranger
Embellishments: (Glaze) Sakura; (3/8" Topnotch Twill Tape - Fresh Linen) Papertrey Ink; (My Sweetest Things - Tangerine "Together" Decorative Tape) My Mind's Eye; (Wood Flags - Hello) Jillibean Soup
I will come back and provide a little more pictures and a description of how the peach colored chrysanthemum was created. But it's late here and I wanted to make sure I snuck this card in on time :)
If you're interested to apply, you have plenty of time! Thank you, Mona, for the chance to apply! Wohoo...
Friday, September 7, 2012
[Catered Crop] In the Pink Quickfire
Hello there! Yep another blog post this week. You're in for a treat, because you'll get to see some gorgeous designs by some ladies who are part of a challenge group called Catered Crop led by sweet & dear Linda McClain. I originally stumbled across this site through Rebecca, my DYSU teamie, who is also a DT member of Catered Crop. So I thought, why not play along?
Well the darndest thing happened, and my North Shore card got a nod of approval when I played along in the last "No Stress Distress Recipe Swap." Evidently Linda calls us the distressing queens? ::cue ABBA's "Dancing Queen" song::..."Distressing Queen, young and sweet, only seventeen..."
Ok, you're not here to hear my oh-so-punny lyrics, so let's get down to business: I am joining Maya and Tracey and the rest of the Catered Crop DT as a Top Chef in this Quickfire: In the Pink. Yep, the name pretty much says it. Pink, pink, pink....and I had to cheat. One can always claim that Kraft is neutral right? It really doesn't...count. Ahem. (Then again those that know me, know I have a hard time following a challenge to a tee...)
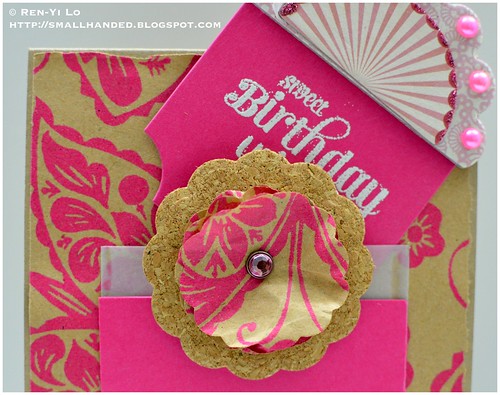
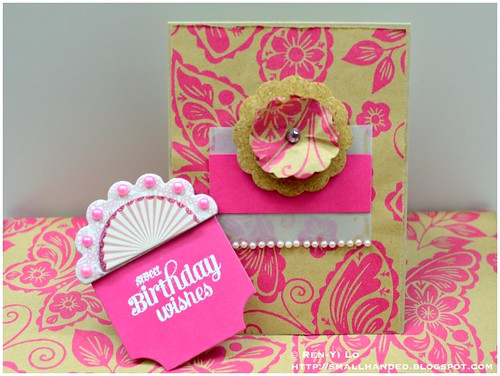
So this card is actually a birthday card for my very special mum. And it just happened that I was wrapping her gift with this delicious pink & kraft paper. After that it was impossible to get this paper out of my head. So instead of fighting it, I decided to take the scraps and make something out of it. As you can see it has a little surprise element - a hidden tag. My mum received her card looking like this...
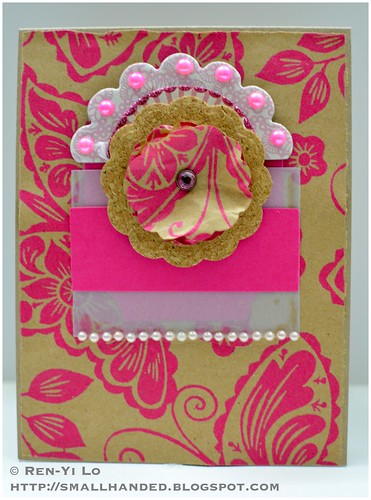
Stamps: (Compact Sentiments) Waltzingmouse Stamps
Paper: (Paper Basics Card Stock - Kraft, Select Vellum) Papertrey Ink; (Kraft & Pink wrapping paper) Paperchase
Ink: (Versamark) Tsukinkeo
Embellishments: (Stamp 'n Stuff - White Opaque Buttons) Stampendous!; (Nestabilities - Big Scalloped Circles Large) Spellbinders; (Mat Stack 3 Die) Papertrey Ink; (Creative Candy Pretty Pearls - Pink) Amuse; (Lost & Found 2 Blush - "Beautiful Girl" Brad, "Better" Layered Chipboard Strickers) My Mind's Eye; (Cork) Recollections
To think of it, if I didn't tell her you can pull the top out, I think she would have just admired it and add it to her other cards on the mantle piece. Maybe I should have made it more obvious...
Anyways, I had this roll of yummy wrapping paper for a while. Borders use to carry lots of cute stationary as well as very gorgeous wrapping paper from Paperchase. So whenever something went on sale, I had to pick it up. This was one of those finds.
The focal point is actually made out of a little cork & wrapping paper flower that I cut out using the Big Scalloped Circles. The flower is adhered with some foam dimensionals so that the sentiment can slide in and out. This gorgeous pink chipboard happened to fit perfectly over the Mat Stack 3 die, making this embellishment not just a pretty little thing to admire, but also to help grab / pull handle for the tag.
In hindsight, I could have embellished that pink strip on the vellum pocket with some Versamark and some Doily patterns, but by the time I thought about that, I already had glued everything down. I'm sure it happens to the best of us... but I'm kicking myself for it. The vellum pocket was measured using the Mat Stack 3 Die plus a little for room & adhering. I just use a simple liquid glue (which is why you can see the glue strips). Any one have advice how to glue down vellum without it peeking through?
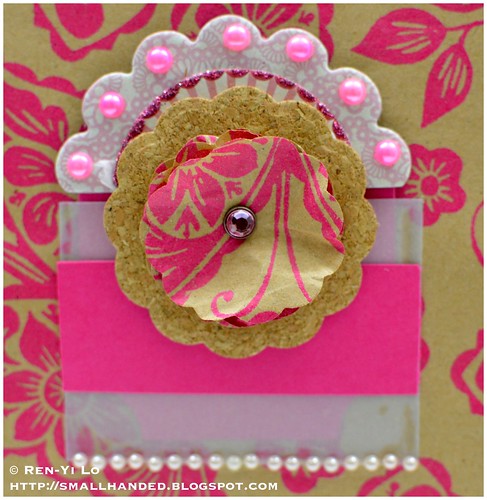
I also thought a little bit of a pearl trim could help anchor the vellum pocket a little. This is what it looks like with all the components of the gift and card out.
Mum liked it lots, but I had to make sure to not schedule this post too early, since she secretly stalks my blog. I know, because she will ask if this or that card that she has seen "featured" on this blog is still available. What can I say - I've become her personal Hallmark ;)
Maybe later this week I will pull some pictures from our birthday spent with Mum...just fair warning, we are a family that loves to eat. Don't be surprise if there are more food pictures than people pictures ;)
I shouldn't keep you anymore. I'm looking forward to seeing what the girls made for this Catered Crop's Recipe Swap and hope that you can find some inspiration in making something pink. I hope you consider joining us. This is a fun group and maybe in future you'll find a way to use your wrapping paper scraps? If so, I would love to see.
Have a fabulous weekend, everyone!
Thursday, September 6, 2012
[DYSU] Challenge #88 - Birthday
It's another challenge at DYSU today! I hope you had fun playing along with us last week. This will be short post since I'm a little short on time, but this week's theme is great because I'm always short on these kinds of cards: Birthday. Yep - have lots of family & friends whose birthday keep my little "sweat shop" year around busy.
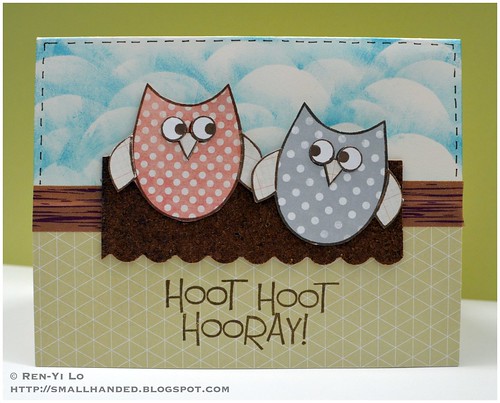
Stamps: (Owls2Love) The Stamps of Life
Paper: (Paper Basics Card Stock - White) Papertrey Ink; (Classic Calico Vol.2) Studio Calico; (Follow Your Heart - Be Amazing, Follow your Heart - Be Happy) My Mind's Eye
Ink: (Jenni Bowlin - No. 11 Brown Sugar; Tim Holtz Distress Inks - Broken China) Ranger
Embellishments: (Woodgrain Washi) Freckled Fawn; (Adhesive Cork) Recollections; (Border Punch - Scalloped Sentiment) Fiskars; (Fine Point - Brown) Sakura Prismacolor
These cute owls are paper pieced and popped onto some cork. I love how they are looking at each other... And I love that I was able to use up some of my (much hoarded) My Mind's Eye Follow Your Heart pattern paper. The cork was an amazing find by my crafty friends Elke at Michaels. The cork comes in a light, a dark, and one with script on it. The best part is that you can run this through a punch or die cut, pull the adhesive off, and stick it down. Easy peasy!
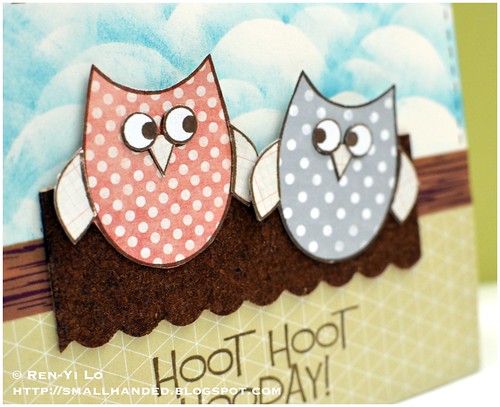
The background is sponged with Broken China. I free-hand cut some curves and used them as a mask to get a cloud sky together. Hope it tickles...Make sure to check out the other DYSU girls' creation and leave them some love. They really poured out their hearts on this project this week!
On a last note, if you're a regular reader, don't forget to answer the survey in the top right panel. A new QuAC poll is up :)
This week's sponsor:
The Stamps of Life
* Winner's Choice of 2 Stamp Sets
Subscribe to:
Comments (Atom)


